Iris Apfel was an outlier in an industry governed by trends driven by seasons and colors; instead of following them, she created her own. Iris apfel died at the age of 102 on March 1, 2024, as an undisputed pioneer who inspired generations of women to embrace their individuality through her colorful outfits, bold accessories, and infectious energy.
Image credit: Getty Images
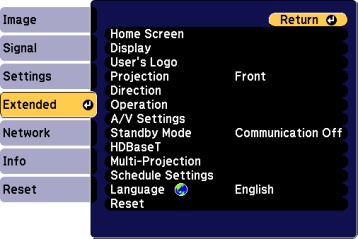
From Queens to Couture: A Life Steeped in Design
Iris Apfel was born in Queens, New York in 1921 and quickly took an interest in fashion from an early age. Growing up in an environment in which her parents ran a fashion accessory business gave her an eye for quality as she developed an appreciation for clothing craftsmanship. Iris Apfel pursued interior design studies at New York University before founding Old World Weavers with Carl Apfel, known for vintage and reproduction fabric production, her passion for unique pieces sparked by their world travels would ultimately influence the formation of her distinct style.
Image credit: Getty Images
The Birth of a Style Icon: More is More
Iris Apfel was known for her distinct fashion choices. She loved bold hues and patterns, wearing eyeglasses with big frames and bold accessories like chunky necklaces or lots of bracelets, wearing big glasses was another trademark look she made her mark with, her closet held old-fashioned treasures mixed in with designer fashion from different cultures, this made for an unexpected yet exciting style which led people to refer to her as the “Accidental Icon.”
Image credit: Getty Images
Beyond the Runway: A Legacy of Confidence and Self-Expression
Apfel was an icon who transcended fashion. She became an iconic cultural figure, appearing on magazine covers, appearing in documentaries like “Iris” (2014) and even partnering with high street brands like H&M. Iris Apfel championed fashion as an avenue to express oneself and celebrate one’s unique spirit, she encouraged people of all ages to embrace their individuality through clothing and never be afraid to stand out in public.
Apfel’s Impact: A Fashion Revolution for All
Apfel’s legacy goes well beyond her clothing collection. She challenged the narrow beauty standards often upheld by fashion industries, proving that fashion wasn’t limited to those young and thin, rather it celebrated individuality as well. Through her unconventional fashion sense, Apfel inspired generations to break away from conformity and embrace their eccentricities, today more than ever her message seems timely and relevant.
Image credit: Getty Images
The Ageless Muse: Inspiration for Generations
Even as she aged, Apfel continued to be an inspiration. She collaborated with brands, attended fashion events and encouraged people to be themselves – her lively personality and infectious zest for life made her much-beloved both within fashion circles and beyond. iris Apfel proved that you can have style at any age. believing in yourself was her greatest style statement of all.
Iris Apfel: A Fashion Icon for the Ages
Iris Apfel’s life and work serve as an inspiring reminder that being yourself can be stylish. She shows us the value in accepting who we are even if it means being different; fashion doesn’t just follow trends – it should express yourself freely while having fun! In a world that wants everyone to conform, Iris Apfel reminds us that being wholly yourself is always best when choosing fashion styles.
Iris Apfel was one of those rare individuals who completely revolutionized fashion and culture. Not afraid to wear whatever she pleased, she encouraged people to be themselves without regard for others’ judgment, she made both fashion and culture better; all while remaining humble. When we remember her incredible work and its lasting legacy let’s not forget Iris Apfel wasn’t simply another fashion star but instead was someone truly engaging with life that inspired many around her – something many in her world sought after but could only find through Iris.
Leap years, which mark an extra one day during February, often spark interest as to their relation to larger phenomena such as climate change. While their relationship may not always be obvious, leap years reveal the intricate interplay between Earth’s rhythms and environmental issues we are currently facing. By looking deeper, we can discover subtle but profound effects from leap years on climate as well as how they relate to current discussions about environmental sustainability by 2024.
Image credit: Getty images
Understanding Leap Years
A leap year arises from Earth’s orbit around the sun, which takes approximately 365.2422 days. To ensure our calendar remains aligned with astronomy and changing seasons, an additional day — February 29th –is added every four years as part of an adjustment mechanism. Otherwise, timekeeping would become disconnected with natural cycles, leading to human timekeeping being unsynchronized from natural cycles.
Climate Change: A Complex Reality
As it is essential to recognize, leap years do not directly have an effect on climate. Instead, they result from complex causes driven by human activities, most significantly greenhouse gas releases, such as carbon dioxide production in the atmosphere accelerating global warming which in turn has far-reaching repercussions like weather disruptions, rising sea levels and disruptions to ecosystems.
Subtle Impacts of Leap Years on Climate
Green Globe On Moss – Environmental Concept
As leap years don’t directly contribute to climate change, they still exert subtle influences that affect Earth’s climate dynamics:
Weather Patterns: An extra day added in February can have subtle but lasting impacts on short-term weather patterns. While these changes might not fundamentally shift climate trends, they could show up as minor fluctuations in temperature or precipitation reflecting atmospheric dynamics and their intricate processes.
Seasonal Shifts: Leap years serve as an effective reminder of Earth’s imperfect orbit and of seasonal variations caused by our changing climate, creating challenges to agricultural practices, biodiversity conservation and ecosystem resilience.
Global Awareness: In addition to their significance as a calendar leap years can provide the opportunity to increase awareness of the intricate ecosystems on Earth and the necessity of environmentally responsible stewardship. A leap year in 2024 is a great an ideal opportunity to participate in discussions about mitigation strategies to combat climate change and to encourage collective action toward sustainable development.
Navigating the Path Forward
As we negotiate the intersection of leap years, and the nexus of climate change 2024, proactive actions are vital to deal with the environmental issues facing our planet:
Reduce Greenhouse gas emissions: Adopting alternative energy resources, improving efficiency in energy use, and promoting for sustainable transportation are crucial steps to reduce greenhouse gas emissions while also reducing the negative effects of climate change.
Promoting Change: Keeping in mind the urgent need for climate action by promoting robust environmental policies and making corporations and governments accountable are essential to creating a sustainable future for the generations to follow.
Accepting Conscious Choices: Adopting the concept of environmental consciousness involves embracing the concepts of reducing, reusing and recycling by making environmentally-friendly choices in your consumer behaviour, and instilling a comprehensive ethos of sustainability in everyday life.
In the intricate web of Earth’s rhythms in time leap years serve as powerful reminders of the planet’s resilience and vulnerability climate changes. In the midst of the realities of climate change in 2024, the interplay of leap year and sustainability emphasizes the need for taking collective action and being stewards of the planet towards protecting our planet for the coming generations. In response to this message to action, we can create the path to an environmentally sustainable and peaceful relationship with the natural world.
Due to their performance, AMD Threadripper CPUs are the best choice for tasks such as animation graphics, coding and gaming at the highest level. In this blog we’ll go over the features of Threadripper CPUs can do, as well as how they differ in comparison to others AMD processors, examine their most important features and advantages they provide and discuss the most popular applications. At the end of this article you’ll have an extensive knowledge of what AMD Threadripper CPUs bring to your work and workflow.
What are AMD Threadripper CPUs?
AMD Threadripper CPUs are a collection of processors that are part to the AMD Ryzen series, which is the flagship product of the company line of laptop and desktop computers. AMD Ryzen processors built of the Zen architecture which is a set of technologies that increase efficiency, performance and scaling capabilities of AMD processors. AMD Threadripper processors have among the strongest and the most sophisticated member of the Ryzen family, with the most cores, threads and caches, and memory bandwidth in all AMD processors.
Threads and cores are fundamental units of power within the CPU. A core is a physical component of the CPU which can perform tasks, whereas threads are a conceptual component of the CPU that can execute a program, or task. The more threads and cores a CPU can have the more applications and tasks it is able to run at once, which boosts the overall performance and speed that the processor can provide. AMD Threadripper CPUs can have up to 96 cores and 192 threads which is more than the typical CPU on the market.
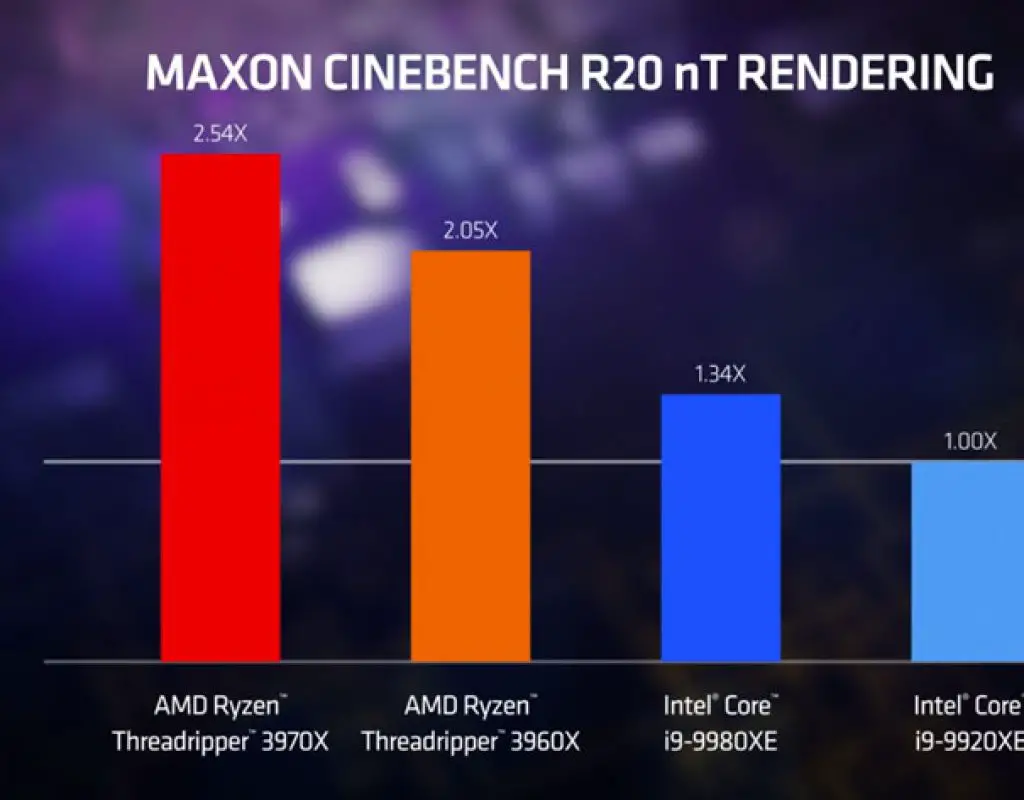
Cache memory can be described as a compact and speedy kind of memory that is located within a CPU, which stores frequently-used data and instructions. It eliminates the requirement to access slow system memory (RAM) which is farther far away, and is slower to get there. When the more L3 cache (the most powerful and important kind for overall efficiency) can be added a CPU, it’s efficiency and performance increase drastically. AMD Threadripper CPUs have up to 299 millibytes of L3 cache which is significantly more than the majority of other competitors on their market.
Image credit: AMD
Memory bandwidth is the speed that a CPU moves information between its memory system (RAM) as well as other components that comprise the computer, such as other storage devices. It is a significant contributor to the overall performance of CPUs and efficiency, allowing more efficient access to and processing of huge quantities of information. AMD Threadripper CPUs can support up to 8 channels of memory modules, which allows them to have access to up two TB RAM. This increases capacity, bandwidth as well as overall efficiency when compared to standard market CPUs.
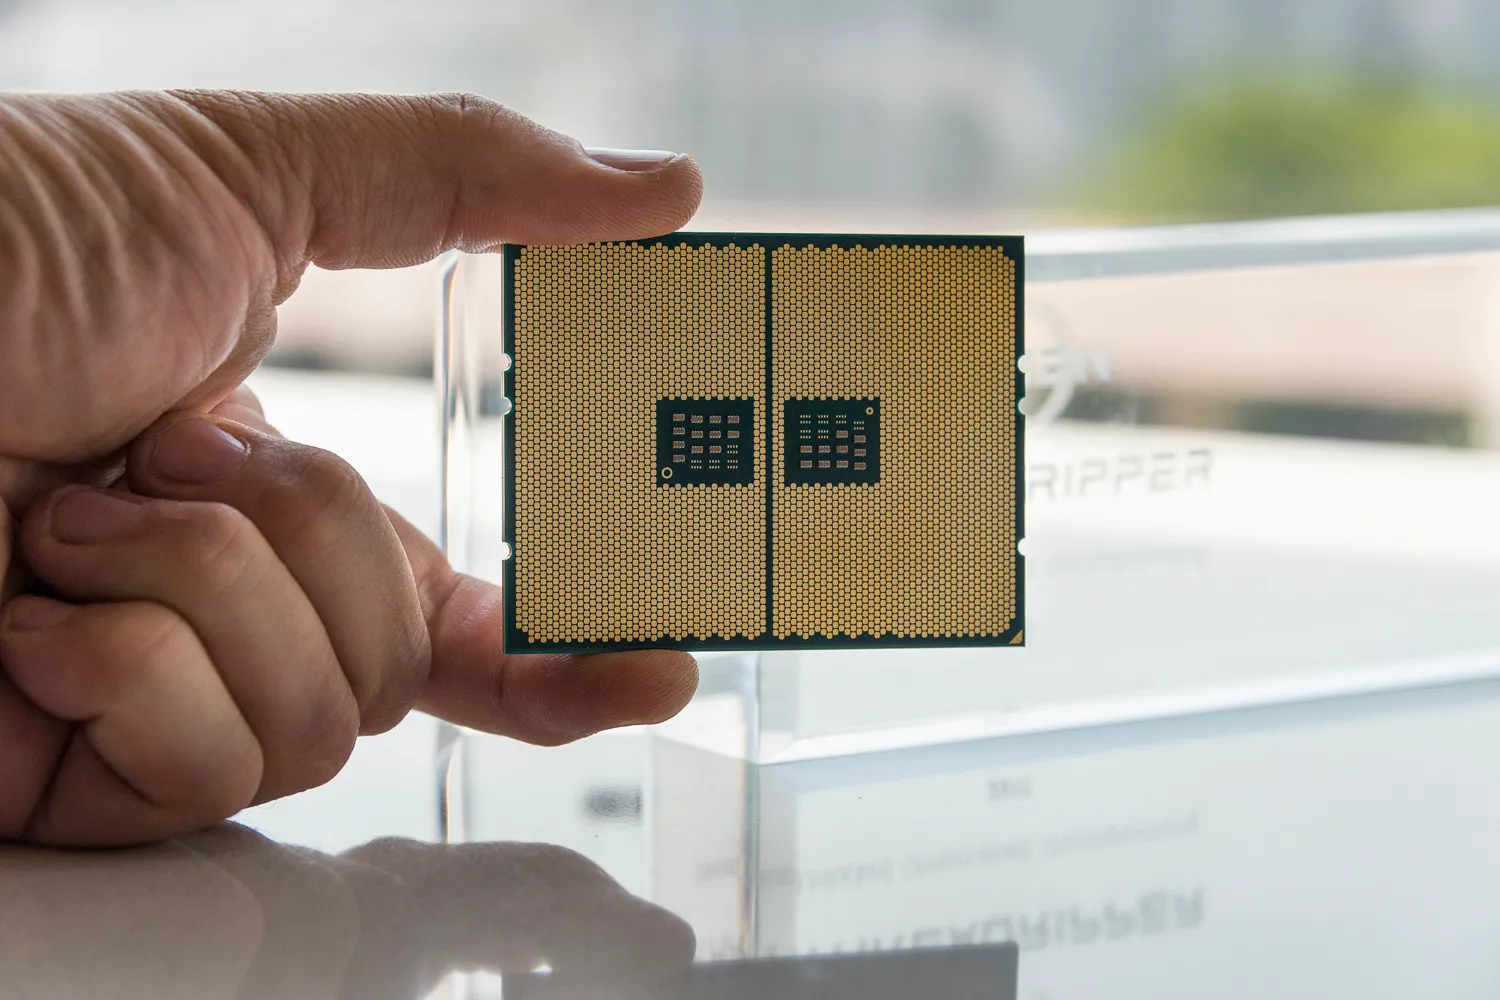
How do AMD Threadripper CPUs differ from other AMD processors?
Image credit: AMD
AMD Threadripper CPUs differ than the other AMD processors in many ways. First, they use an exclusive threadripper socket and chipset; these components connect directly with each other rather than sharing components like AM4 sockets and X570 chipsets commonly found among Ryzen CPUs. AMD Threadripper processors employ the sWRX8 socket with its proprietary WRX90 chipset exclusively designed for their threadripper series which offers more features and expandability compared to traditional AMD systems with AM4 socket and X570 chipset used on most Ryzen processors.
Second, AMD Threadripper processors offer more PCIe lanes than standard Ryzen processors. PCIe lanes serve as physical connections that enable the CPU to communicate with devices connected to its motherboard such as graphics cards, storage drives and network cards – so more lanes mean more devices it can support faster data transfers between them – leading to improved overall performance and functionality in general. AMD Threadripper CPUs typically offer up to 148 lanes, far surpassing most Ryzen CPUs which typically offer 40. Additionally, most AMD Threadripper CPUs support PCIe 5.0 as opposed to most Ryzen processors which support PCIe 4.0 standards; many Ryzen CPUs do not support PCIe 5.0 standard!
Third, they include more features for PRO than regular Ryzen processors. PRO features are a collection of technologies that increase the security, manageability and the reliability of AMD processors designed for professionals as well as business-related users. The PRO features AMD Threadripper CPUs come with include:
AMD PRO Security: It gives hardware-based protection against malware viruses and other threats by encrypting and securing sensitive information and programs from access by unauthorized persons.
AMD PRO Manageability: It lets admins of IT remotely monitor, control and manage AMD systems employing industry-standard instruments and protocols.
AMD PRO Reliability: It assures reliability and stability of AMD systems by utilizing rigorous testing and validation procedures in addition to offering long-term support and a warranty.
What are the main features and benefits of AMD Threadripper CPUs?
Image credit: AMD
AMD Threadripper CPUs is a range of high-performance CPUs designed specifically for enthusiast and workstation users. They include the following benefits and features:
1. Higher core and thread counts: Threadripper CPUs boast an extraordinary number of cores 96 to 192 allowing them to simultaneously tackle numerous demanding tasks efficiently and quickly. Threadrippers are particularly well suited for applications requiring high speed performance such as video editing rendering simulation or engineering.
2. Higher clock speeds and large cache memory: Threadripper CPUs offer high boost and base frequencies of 2.5GHz to 5.1GHz for fast performance in light and single threaded applications. Furthermore, their L2 and cache memory capacities reach 384MB and 96MB respectively to further reduce latency and speed access to data.
3. Advanced AMD technologies: Threadripper CPUs utilize Zen 3 core architecture, providing greater speed, efficiency, and power management than its predecessor generation. Furthermore, Threadrippers utilize AMD Infinity Fabric interconnect for faster data transfers at reduced latency levels with greater bandwidth capacity allowing more efficient computing systems overall.
4. Workstation-class features: Threadripper CPUs support 8 channels of DDR5 memory, offering greater capacity, speed, and reliability compared to DDR4 memories. They are compatible with PCIe 5.0 which doubles bandwidth performance of PCIe 4.0 which enables faster connectivity to storage devices, graphics cards devices and peripherals; additionally they support AMD PRO technologies like AMD Secure Processor Memory Guard along with AMD PRO Manageability that provide improved security, encryption features and remote management features for workstation users.
Advantages and Disadvantages of AMD Threadripper CPUs
Image credit: AMD
AMD Threadripper CPUs are high-performance desktop workstation processors designed by AMD specifically to address professional needs in video editing, 3D rendering, scientific computing and engineering. Although ideal for these uses, AMD Threadripper CPUs are also very costly and not optimized for gaming; here are some advantages and disadvantages of these CPUs:
Advantages:
Multi-core CPUs that are powerful can provide outstanding multithread performance. This means they can handle multiple threads or processing concurrently.
They are equipped with lots of PCIe lanes that allow users to link to different peripherals and devices without limiting the performance.
They have a rapid memory support that allows them to access data swiftly and effectively.
These AMD PCs offer extremely competitive prices, which makes them less expensive than their Intel counterparts.
They can multi-task without slowing down, running multiple applications and programs simultaneously without any issue.
Disadvantages:
These devices don’t excel at handling one task at a time, making them unsuitable for games or apps that require focused concentration on one thing at once.
They consume a lot of power and consequently become hot, necessitating extra cooling measures.
Certain motherboards and chipsets only support their unique design and features.
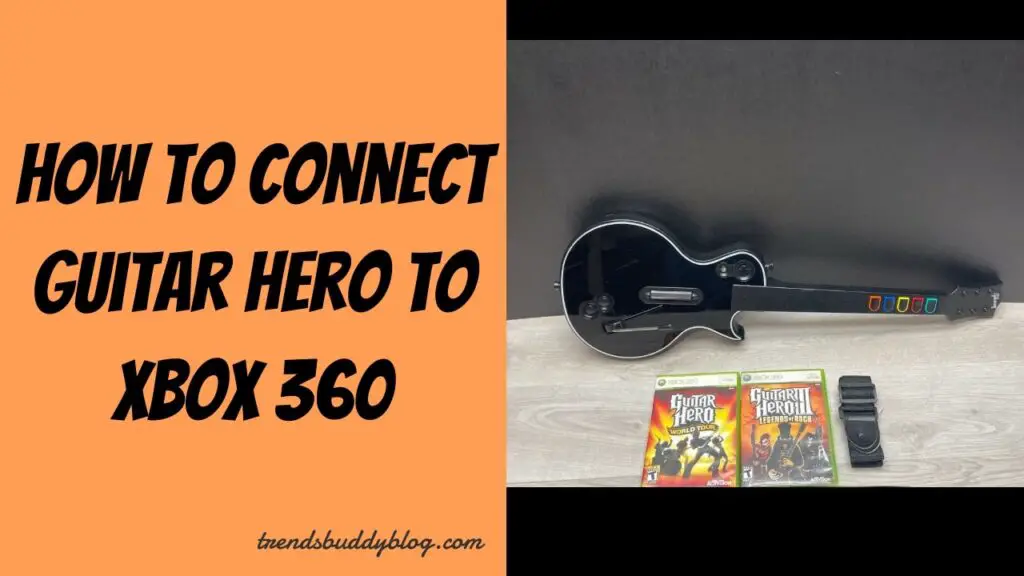
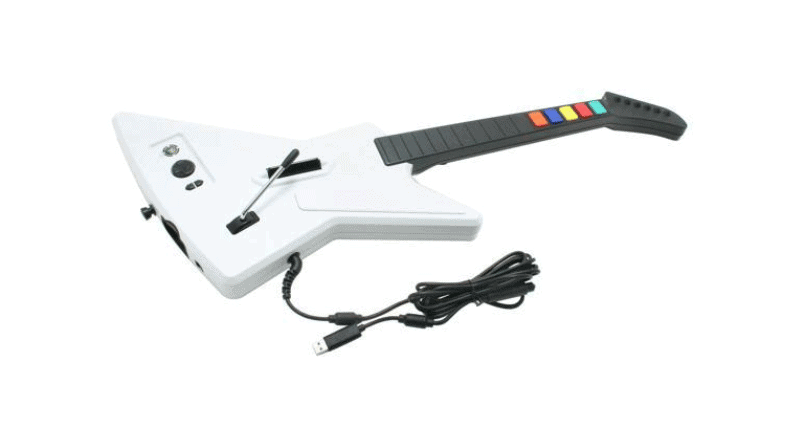
Guitar Hero is an extremely popular music video game featuring singing your favorite tunes with a guitar-shaped controller. If you own both an Xbox 360 console and Guitar Hero controllers, and are looking to connect them together to enjoy this popular game, in this blog provides three methods for connecting them based on whether your controller is wired or wireless and whether a dongle is involved.
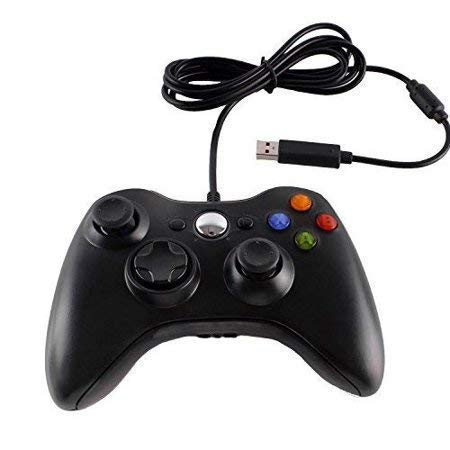
Option 1: Using a Wired Controller
If you have one of the digital Guitar Hero guitar, you can connect it to your Xbox 360 using a wired Xbox 360 controller. This is the easiest and affordable choice, because there aren’t any additional accessories. Here’s how to accomplish it:
To connect your wireless controller with your Xbox 360 console and use it in conjunction with you Guitar Hero game, follow these steps-by-step directions:
Connect the wired controller on any of the available USB ports of your Xbox 360 console.
Start up both your Xbox 360 console and Guitar Hero guitar. you will find its power button located near its directional pad on its front face.
Insert the Guitar Hero game, wait a moment or so, and allow it to load completely before proceeding with playback.
Simply press the sync button on your Xbox 360. This small circular button is found near where memory card slots are.
Hold the sync button of your Guitar Hero guitar as it searches for a connection with an Xbox 360 system. You will observe four lights flash on both devices simultaneously until only one remains illuminated, and then you are free to release its sync button.
Launch Guitar Hero on your Xbox 360 and navigate to its controller settings. Within these settings, there should be an option for guitar input; choose wired controller as the input device for your guitar.
Source: Amazon
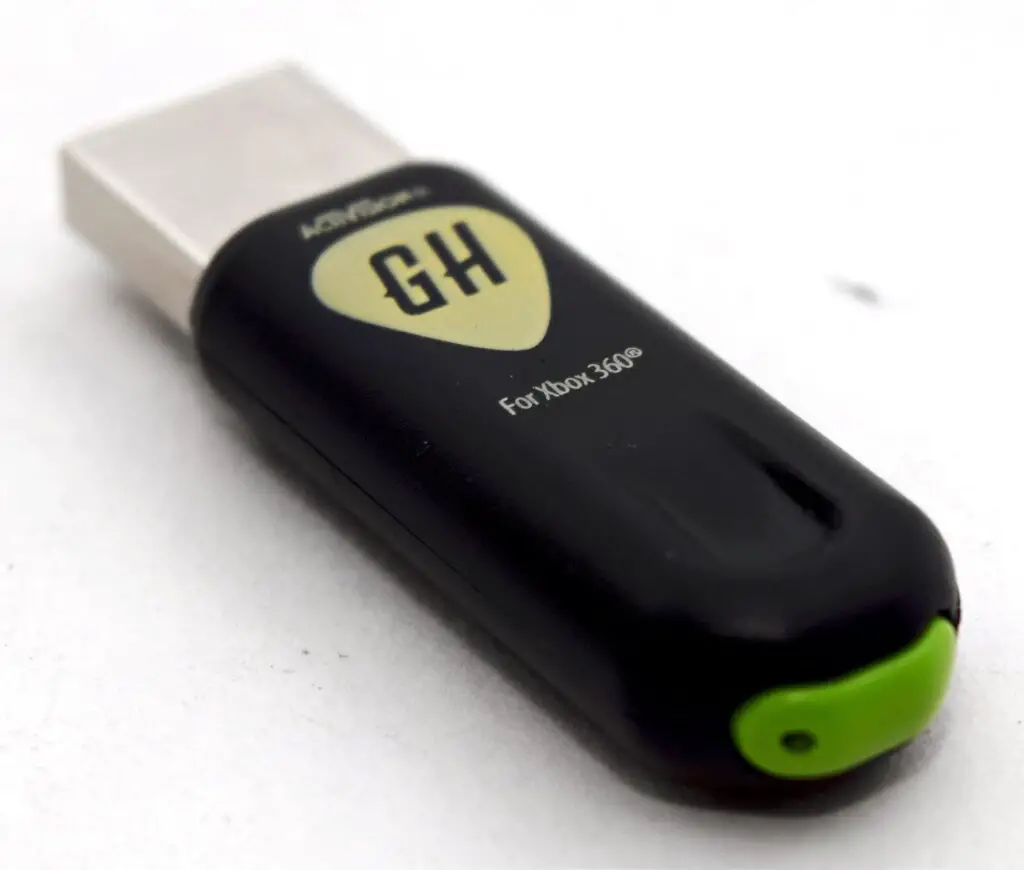
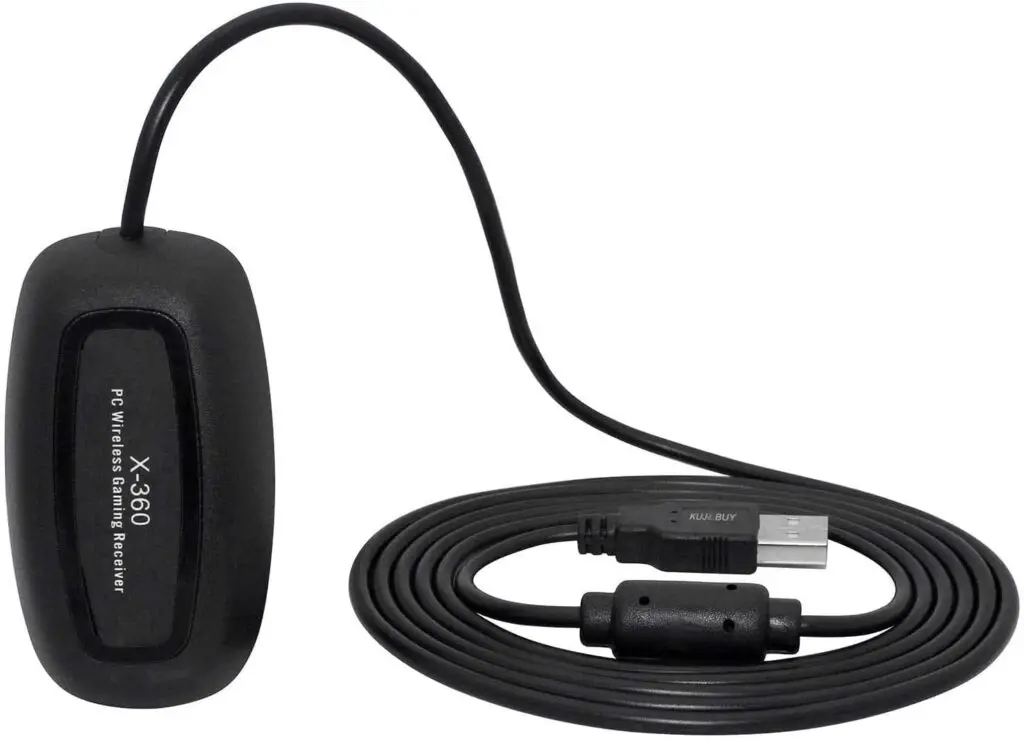
Option 2: Using a Wireless Receiver
Another method of connecting to connect your Guitar Hero guitar to Xbox 360 without the need for a dongle is to connect it with a wireless transmitter. Wireless receivers are device that plugs into the USB connection on the Xbox 360 console and allows the wireless guitar to connect directly with your console. You can purchase wireless receivers online or in most gaming stores.
When you’ve equipped your Wireless receiver then follow these instructions to join the Guitar Hero guitar to the Xbox 360:
Connect the wireless receiver to the USB connector on your Xbox 360 console.
Switch on the Xbox 360 and the Guitar Hero guitar.
Hold to sync the receiver’s button until it starts to blink.
Hit “Sync” on your Hero guitar.
Watch for the lights on the wireless receiver as well as the guitar not to blink and remain in place.
Begin by opening Guitar Hero on your Xbox 360 and then navigate to the controller settings of the game. In the game’s settings for controllers you will see an option to choose the input device for your guitar. Select the wireless receiver as the input device for your guitar.
Source: Amazon
Option 3: Using a Third-Party Dongle
The third method of connecting Guitar Hero guitar to Xbox 360 without the need for an internal dongle is by using the external connector. Third-party dongles refer to an item that isn’t made by the first Guitar Hero manufacturer, but is compatible alongside the console and guitar. There are a range of third-party dongles through the internet or at certain gaming stores.
If you want to connect your guitar with a dongle from a third party Follow these steps:
Connect the third-party adapter to the controller port on the Xbox 360 console.
Switch on the power on your Xbox 360 console and your Guitar Hero wireless guitar. The control button on your guitar’s face of the guitar just next to the direction pad.
Install the game in your Guitar Hero game and allow it to load.
Use the sync button of the dongle that is a third-party device. The sync button of the dongle is typically a small button situated in the back or on front on the back of the gadget.
Hit the button to sync on the Guitar Hero guitar.
Watch to see if the LEDs on the dongle from a third party and your guitar, to cease blinking, and then remain in place.
Start Guitar Hero on your Xbox 360 and then navigate to the controller settings of the game. In the controller settings of the game there should be the option to select guitar input. Select a third-party dongle to be the input device to the guitar.
Source: Amazon
Troubleshooting Tips
If you have any issues in connect the Guitar Hero guitar to Xbox 360 without a dongle below are some troubleshooting suggestions which might be helpful:
Make sure that your batteries are clean and placed properly into your guitar controller.
Check that your wireless controller, wired controller or a third-party dongle is connected securely and functioning properly.
Make sure that your Xbox 360 console and your Guitar Hero game are updated to the most recent version.
Be sure that there isn’t any obstruction or interference between the guitar controller and your Xbox 360 console.
Reset your guitar’s control by pressing your power switch for 10 seconds, then switching it back on.
Try resyncing your guitar controller using the same sync method that was described earlier.
Try using an alternative USB connector or even a controller port to your Xbox 360 console.
Try using an alternative instrument controller or wired wireless receiver or third-party dongle if you can.
Connect Your Xbox 360 Hero Guitar to PC: Wired & Wireless Solutions
Method 1: Connect a Wired Xbox 360 Guitar Hero Controller to PC
If you own connected Xbox 360 Guitar Hero controller, then you are in the right place. Connecting it to a PC is a breeze. All you require is an USB connector on your computer as well as the USB cable from your controller.
Below are some steps that you must take:
Connect the USB cable from your controller into an USB connection on your computer.
You must wait for Windows to install automatically the drivers needed that your controller requires. You will receive a message when the controller is now ready to be used.
Play your preferred Guitar Hero game on your PC and have fun!
Source: Amazon
Method 2: Connect a Wireless Xbox 360 Guitar Hero Controller to PC
If you own a Wireless Xbox 360 Guitar Hero controller, an additional accessory will be necessary in order to connect it to your PC. A Wireless receiver or dongle which communicates with your controller would do just fine.
Here are the steps you should follow:
Find a wireless receiver dongle compatible with Xbox 360 controllers online or from local retailers; make sure it comes equipped with an USB connector to plug it directly into your computer.
Plug the wireless receiver, or dongle into an available USB connection on the computer.
Take action by pressing the sync switch on your controller, and it will begin searching for connections.
Click the sync button of the wireless dongle or receiver so that it begins looking for a connection.
As soon as you connect your controller and dongle or receiver, a solid glow should appear on both devices as soon as they’re linked together. Once connected, start your desired Guitar Hero game on PC and get playing!
Source: Amazon
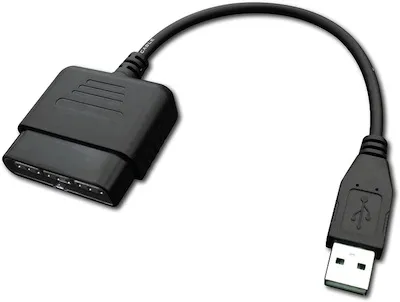
Method 3: Connect a PS2 Guitar Hero Controller to PC
If you own a PS2 Guitar Hero controller, then it can also be used on PC with some adapters and drivers. A PS2 to USB adapter is needed to connect its PS2 connector with the PC’s USB ports.
Here are the steps you need to follow:
Buy a PS2 to USB adapter compatible with PS2 controllers – either online or at local stores – that has a USB connector to plug directly into your PC.
Plug your PlayStation 2 controller’s PS2 connector into a PS2 to USB adapter.
Simply plug the USB connector of the adapter into any of your PC’s available USB ports.
Wait for Windows to automatically install the required drivers for your controller, and when ready you will see a notification that indicates its readiness.
Launch your favorite Guitar Hero game on PC and have fun!
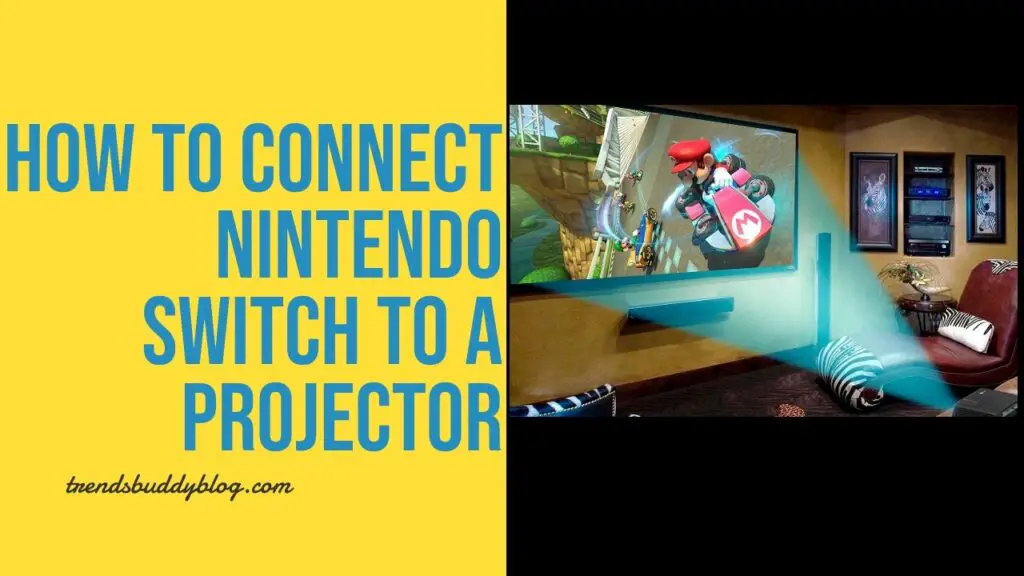
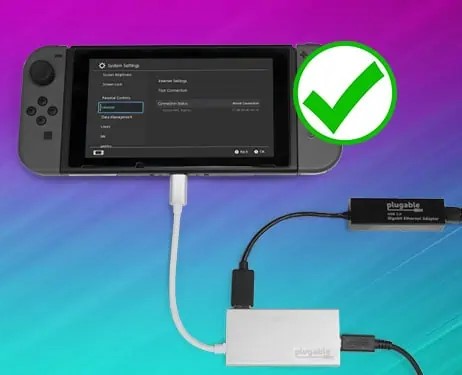
Your Nintendo Switch allows for many ways of gaming enjoyment; be it using it directly in your hands, connecting it with a huge display, or hooking it up to a projector and projecting games onto walls and screens – but connecting this way may require extra items and steps – in this blog we’ll show how easily and quickly this can be done! In just four steps we’ll demonstrate how to connect Nintendo Switch with projector.
What You Will Need
To connect a Nintendo Switch to a projector, the following items will be required.
A Nintendo Switch console and its dock
A projector with an HDMI port or a VGA port
An HDMI cable
An HDMI to USB-C adapter or an HDMI to VGA adapter (depending on the type of port on your projector)
Step 1: Connect the HDMI Cable to the Adapter: First, connect an HDMI cable to an adapter corresponding to your projector’s port type: for an HDMI projector you will require an HDMI-to-USB-C adapter; otherwise VGA port users will require an HDMI-VGA adapter. Plug one end of your cable into an HDMI port on either adapter before plugging it directly into its respective slot on your projector.
Image Credit: Amazon
Step 2: Connect the Adapter to the Nintendo Switch: Next step is connecting the adapter to your Nintendo Switch console. In order to do this, take care to remove it from its dock and unplug Joy-Con controllers from their sides before plugging the USB-C end of the adapter into its port on the bottom of Nintendo Switch.
Image Credit: Amazon
Step 3: Adjust the Projector Settings: Once your Nintendo Switch has been connected to a projector, the next step should be adjusting its settings so as to provide the optimal image display. You may use either your remote control or on-screen menus to choose an HDMI or VGA input source and adjust resolution, brightness, contrast, focus and keystone correction settings accordingly. You may even require keystone correction or zoom settings so the image fits onto either screen or wall correctly.
Image Credit: Epson
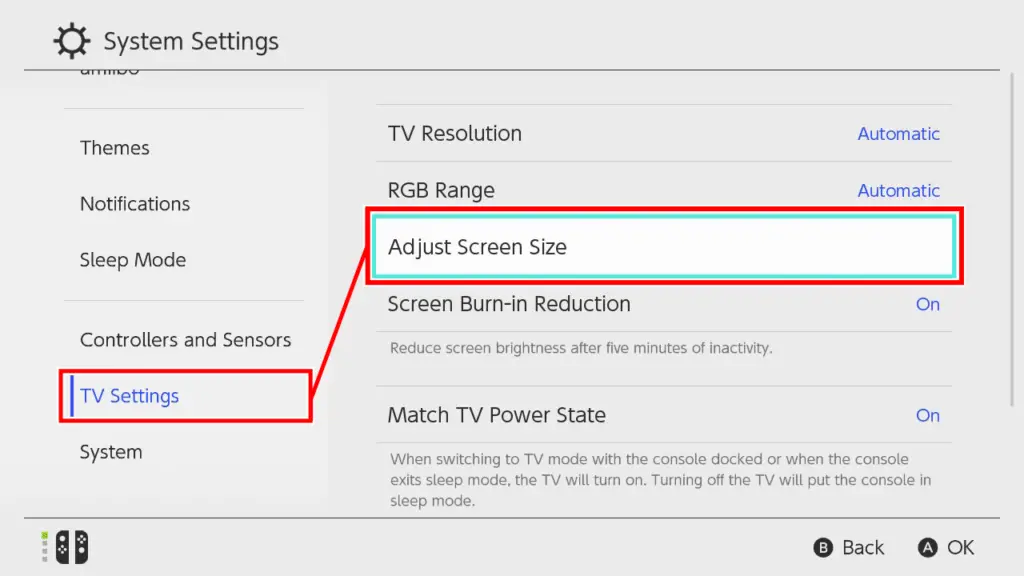
Step 4: Adjust the Nintendo Switch Settings: After configuring your projector settings, it may be necessary to modify your Nintendo Switch settings as well. To do this, attach Joy-Con controllers to each side of the Nintendo Switch and dock it again before going into System Settings > TV Output on the Nintendo Switch to adjust screen size and resolution accordingly. Moreover, here you can change sound output from Nintendo Switch speakers directly onto projector speakers or an alternative system.
Image Credit: Nintendo
Step 5: Enjoy Your Games on the Big Screen: Your Nintendo Switch games are now ready for viewing on the big screen! Use either Joy-Con controllers or Pro Controller to enjoy them, while switching between handheld mode and TV mode by taking it out or placing it back into its dock. Have fun!
The ability to connect the Nintendo Switch to a projector is an excellent method to improve your gaming experience and play your games on a huge and vivid display. There are a few other items and steps enable this connection however it’s not difficult or complicated. We hope this article will help you understand how to connect your Nintendo Switch to a projector in just a few easy steps. Happy gaming!
How to Connect Nintendo Switch to a TV
Nintendo Switch is a unique gaming console that plays in various modes, including tabletop, handheld, or TV. TV mode lets you play playing games with a larger screen that has better audio and graphics. To play games with TV Mode, it is necessary be able to link the Nintendo Switch to a TV with a dock and cables. In this blog we’ll explain how to connect the Nintendo Switch to a TV in just a few steps.
What You Will Need
For connecting your Nintendo Switch to a TV you’ll need the following things:
A Nintendo Switch console and its dock
A TV with an HDMI port
An HDMI cable
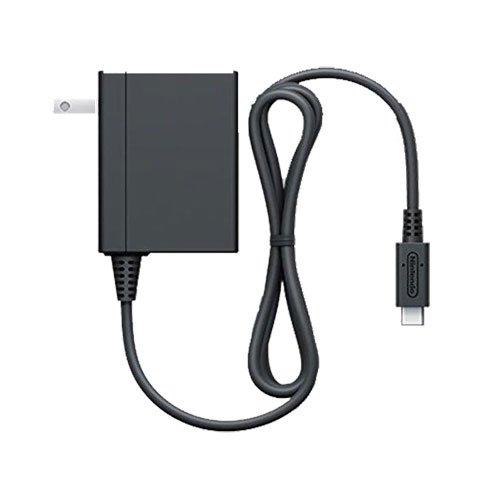
A Nintendo Switch AC adapter
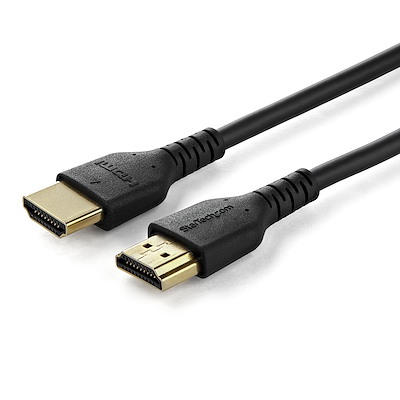
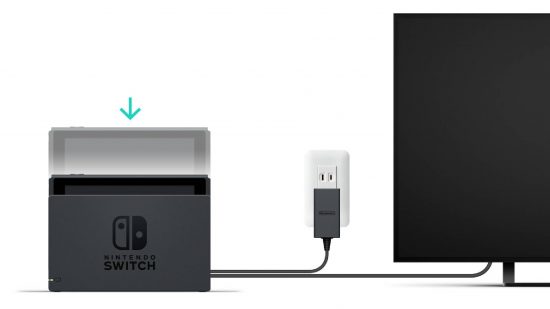
Step 1: Connect the HDMI Cable to the Dock and the TV
It is the first thing to do connecting to connect the HDMI cable between the dock as well as the TV. To complete this task take these steps
Take out the Nintendo Switch dock and open the cover on the back.
Connect in one of the ends of an HDMI cable to an HDMI outlet port in the dock.
The cable should be routed through the cut-out in the dock’s back cover.
Close the cover on the back.
Connect the opposite end of your HDMI cable into the HDMI port on your TV.
Image Credit: Technewstoday
Step 2: Connect the AC Adapter to the Dock and the Power Outlet
Step two is connecting the AC adapter to both the dock and power outlet. For this task, follow these steps:
Connect the USB-C port from the AC adapter to the power adapter port of the dock.
Connect the cable to the hole on the dock’s cover back.
Close the cover on the back.
The opposite end of the AC adapter into an outlet for power.
Image Credit: Amazon
Step 3: Dock the Nintendo Switch Console
Final step in docking the Nintendo Switch console: Follow these steps:
Remove both Joy-Con controllers from your console.
As soon as you hear a click, insert your console.
Automatic TV Mode. Once activated, the console will switch automatically into TV Mode and display images directly on its television screen.
Step 4: Enjoy Your Games on the TV
Now you’re all set up and ready to enjoy games on the big screen with Joy-Con or Pro Controller controllers, or both! Switch between TV mode and handheld mode simply by taking out or placing in on its dock – have fun!
Connecting your Nintendo Switch to a television is quick, simple, and will make gaming on the big screen that much more exciting! Just grab some necessities and follow these steps; soon enough you’ll be gaming on a larger screen in no time at all – enjoy!
Can I connect my Nintendo Switch to a computer monitor?
There are different methods available to you for connecting your Nintendo Switch to a computer monitor, depending on which port and cable are available to you. Here are a few possibilities:
1. Using an HDMI cable: If your monitor has an HDMI port, using an HDMI cable to connect it with the Nintendo Switch dock is the simplest and most straightforward method of connection. Please refer to our guide on how to connect a Switch to an HD monitor using HDMI for instructions on this step-by-step process.
Image Credit: Amazon
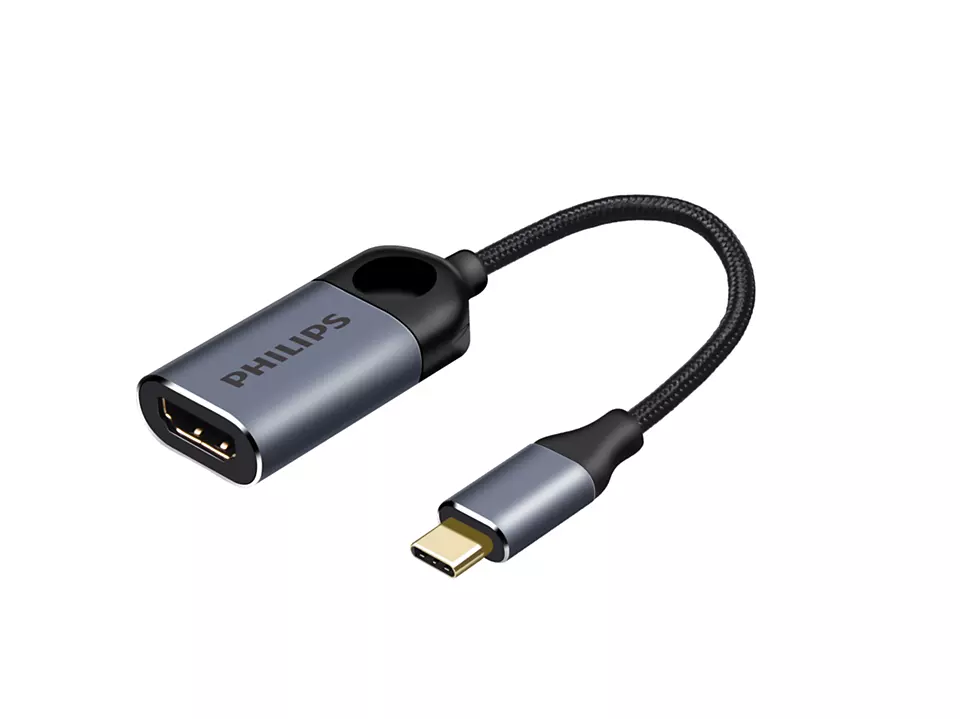
2. Using a USB-C Port: If your monitor features a USB-C port, a USB-C to HDMI adapter is an effective way to connect it with a Nintendo Switch console. This method doesn’t require docks; rather, an adapter that includes power from USB-C input as well as standard HDMI port, USB 3.0 port and a USB-C connector is all necessary. You can follow our step-by-step guide on how to link a monitor via USB-C connector.
Image Credit: Amazon
3. Using a VGA Port: If your monitor features VGA ports, an HDMI to VGA adapter may help connect it to the Nintendo Switch dock. This method is similar to using HDMI cables; however, an adapter that includes both an HDMI input and VGA output may be needed instead of just HDMI alone. You can follow our step-by-step guide on how to link a Switch with a monitor using this method.
Image Credit: Amazon
Connecting a Nintendo Switch to a computer monitor is an ideal way to enjoy games on a larger and clearer display. There are various methods and cables you can use depending on what port your monitor has; we hope this blog post has provided enough instructions on how to connect Nintendo Switch with ease! Happy gaming!
How to Connect Nintendo Switch to a Laptop
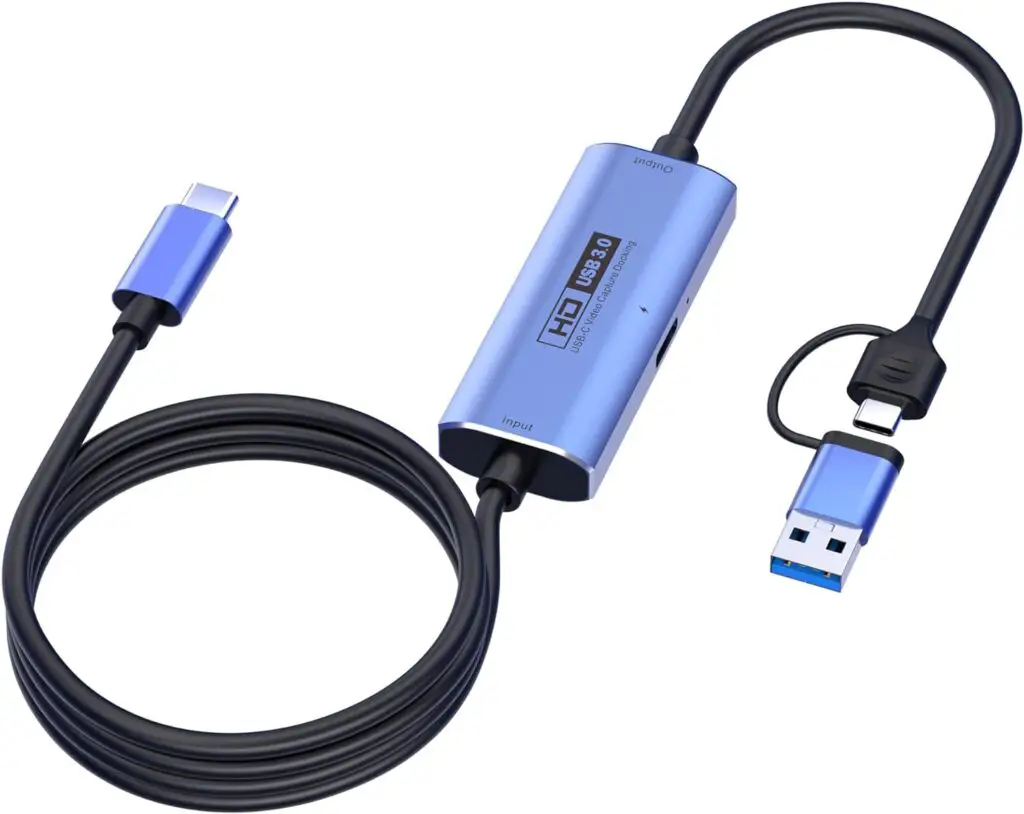
Nintendo Switch is a popular gaming console that allows you to play games while on the move or even on your TV. What if you wanted you to stream games on your Switch games on your laptop’s display? Do you think it is possible to connect your Nintendo Switch to a laptop? Yes however, you’ll need extra hardware as well as software in order to allow it to work. This blog article I’ll provide two methods to connect the Nintendo Switch to a laptop by using the capture card or an PC monitor.
Imagine enjoying a cool video game on your Nintendo Switch but would rather watch it on your laptop screen instead. A capture card acts like an intermediary to help connect both devices so you can both play your game while recording its progress – perfect for streaming purposes or sharing gaming adventures with everyone!
To use this approach, you will require the following items:
Nintendo Switch and Dock
HDMI cable
Capture card (such as Elgato HD60)
Capture software (such as Game Capture HD or VLC Player)
Below are the steps for linking Nintendo Switch with a laptop using a capture card:
1. Remove Nintendo Switch from TV: Remove your Nintendo Switch from your TV If it’s connected.
Image Credit: Nintendo
2. Set Nintendo Switch in Dock and remove Joy-Con controllers: Set it in its Dock. Switch inside its Dock, and take out the Joy-Con controllers at each side of the Switch.
3.Connect HDMI cable from Dock to capture card: Attach the dock to the card via HDMI. Connect in the HDMI cable through the HDMI Out port on the Dock then plug the other part of it into the HDMI port on the card. Close the back of the Dock once you’re done.
4. Connect capture card to laptop with USB cable:The capture card should be connected to the laptop through USB. The capture card will include an USB cable to do this. Connect into the USB cable to the USB port on the card, while the opposite end into the USB port in your computer.
Image Credit: Amazon
5. Pressing the Home button on any controller connected: Connect your laptop to connect the Nintendo Switch by pressing the Home button on any controller connected.
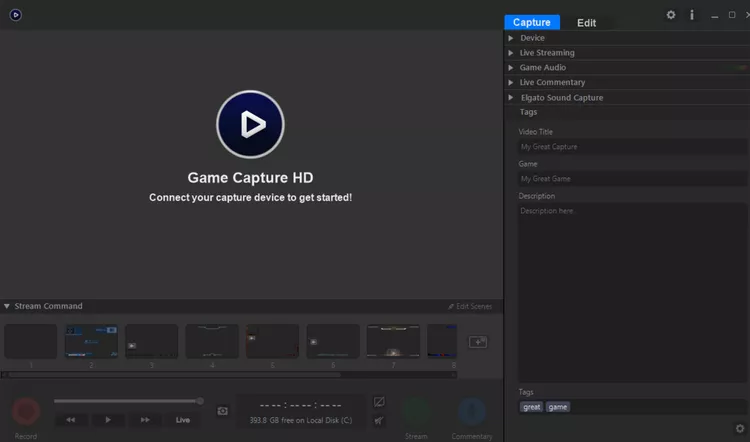
6. Installing the capture program from your personal computer: You can download this free Game Capture HD software from Elgato or any other player that can support video capture, for instance VLC Player.
Image Credit: Lifewire
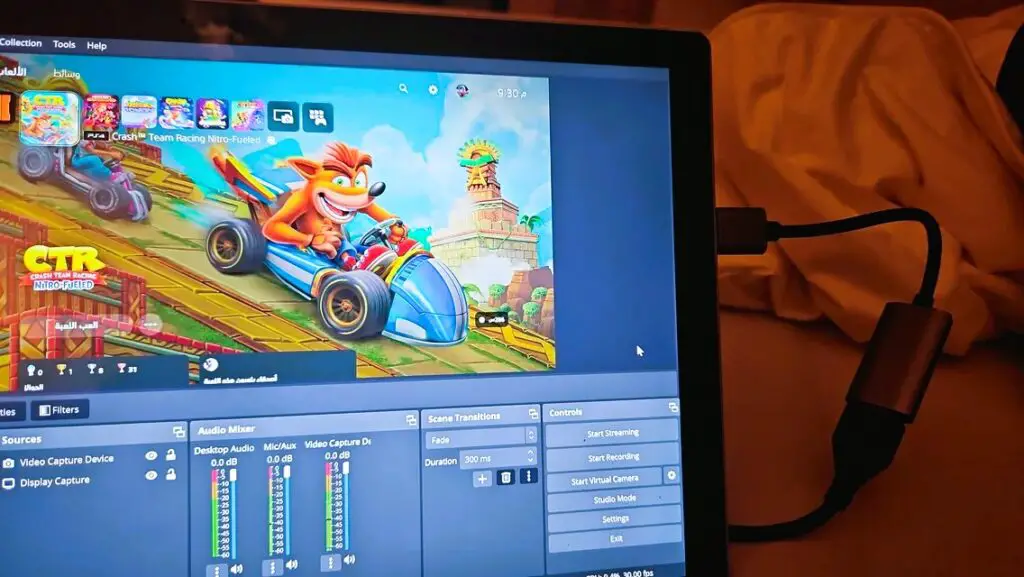
7.Choosing the capture card as the video and audio source: In the software for capturing choose the capture card as the video source, and as the source for audio. You should be able to see your Nintendo Switch home screen within the window of the software to capture.
8.Click full-screen icon to play games in full screen mode: To play games on full screen mode, click the full-screen icon at the upper right corner of the software window. Be cautious not to use your keyboard or mouse since this could cause you to exit the Full Screen mode. It is possible that the Nintendo Switch footage should automatically expand to completely fill the screen itself.
Image Credit: Reddit
You can now play Nintendo Switch games on your laptop, just like you do on a television. You can also utilize the software for recording or stream your gaming should you wish to.
Equalizers are tool which allows you to modify how your system’s frequency responds. By increasing or decreasing specific frequency bands, an equalizer enables you to enhance or diminish certain aspects of sound such as bass, treble or vocals – thus improving sound quality of music, movies or games and making them more enjoyable.
However, connecting an equalizer to your stereo receiver or amplifier may prove more complex without a tape monitor loop. A tape monitor loop consists of input/output jacks that enable users to insert an external device such as an equalizer between their source device and amplifier – so they can process audio before reaching speakers.
Many modern receivers or amplifiers don’t feature tape monitor loops, but that doesn’t stop you from using an equalizer. There are still ways of connecting an equalizer without one depending on which connections are available on your devices; we will show how in this blog post using preamp output and main amp input connections on receivers or amplifiers as examples.
What You Will Need
To connect an equalizer without using a tape monitor, the following equipment will be needed:
Stereo receiver or amplifier
Equalizer unit
RCA cables
Speaker wire (if necessary)
Audio source (e.g., CD player, turntable, etc.)
Step-by-Step Connection Process
Here are the steps for connecting an equalizer without using a tape monitor, using only your receiver or amplifier’s preamp output and main amp input connections:
1. Determine the optimal placement: Before connecting your equalizer, carefully choose where it will sit within your audio setup. Make sure it is easily accessible while providing sufficient ventilation.
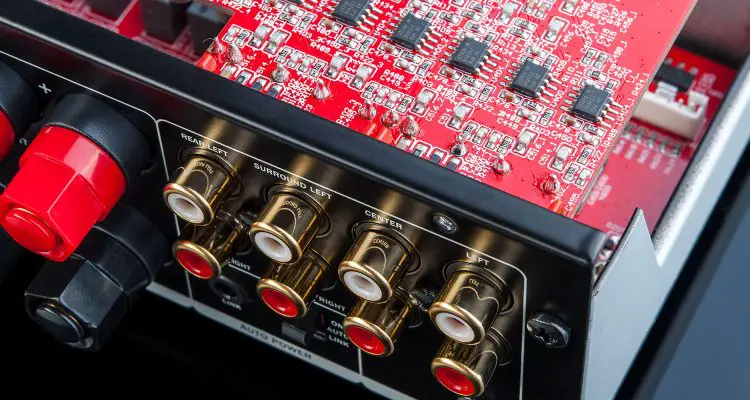
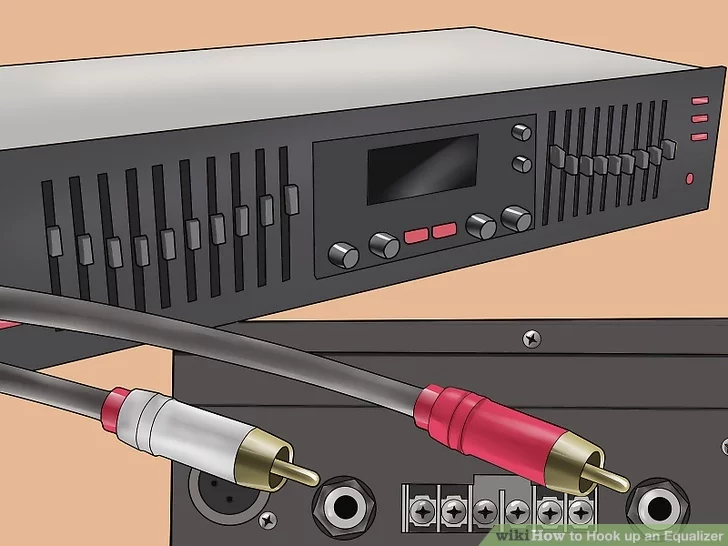
2. Identify the preamp output and main amp input: Locate the preamp output and main amp input connections of your receiver or amplifier, typically marked on its back panel or user manual, which are also sometimes referred to as pre-out and main-in. These allow you to isolate pre-amplification from power amplification stages on your device while inserting an external device such as an equalizer in between.
Image credit: Teufelaudio
3. Connect the equalizer input: Place one end of the RCA cables into the preamp output connections on your receiver or amplifier and connect them. Make sure the left and right channels match up properly; color coding of cables and jacks often helps in this regard, with red being assigned for right channel and white or black for left channel.
Image credit: Soundcertified
4. Connect the equalizer output: Attach the other end of the RCA cables to their respective input connections on the equalizer unit, making sure to match up left and right channels accurately.
5. Connect the audio source: If you are using an external audio source such as a CD player or turntable, use RCA cables or any other appropriate connection method to link them directly with a receiver or amplifier. Any of the inputs besides the phono input may be used, including CD, AUX and DVD inputs.
Image credit: Amazon
6. Connect the equalizer to the receiver or amplifier: Plug another pair of RCA cables from the output connectors on the equalizer unit into the main amp input connections on your receiver or amplifier, being sure that both left and right channels match correctly.
Image credit: Esotericsound
7. Power on and test: Install and turn on all devices, then select the input on your receiver or amplifier that corresponds with your audio source (for instance if your CD player was connected to CD input on your receiver or amplifier, select CD input as the appropriate choice for it). Adjust volume and equalizer settings according to your personal preferences – once this effect has taken place you should hear sound coming through speakers with equalizer effect applied.
Connecting an equalizer with no tape monitor isn’t as difficult as it appear. Utilizing the preamp output as well as the primary amp output connections of your amplifier or receiver it is easy to integrate an equalizer into your system to enjoy a personalized audio experience. I hope this blog entry has been informative and useful.
How to Connect Multiple Audio Sources to the Equalizer
Equalizers, which resemble magic wands for audiophiles allow you to alter the soundscape, increasing or lowering frequencies to create the ultimate sound. What happens when several audio streams compete to be the focus of your equalizer? Be assured that multi-source masters have come to help! This blog is your guide on connect multiple streams of audio to the same equalizer.
The Two-Source Scenario:
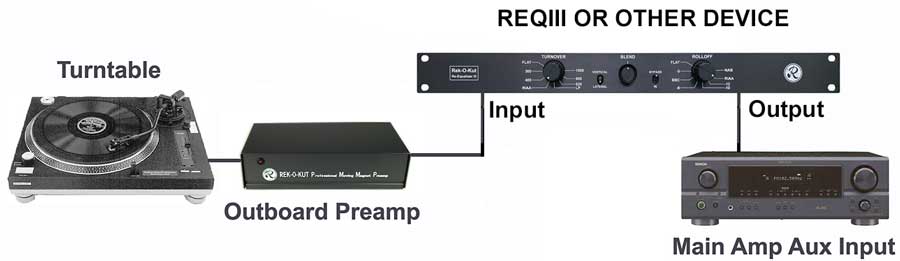
Let’s begin with the most commonly found setup: If you have both a turntable and cassette deck that need equalizing, here is how you can bring them together:
1. Gather your gear: Your source materials might require different output types (for instance 3.5mm jacks). Therefore, adapter cables might also be necessary.
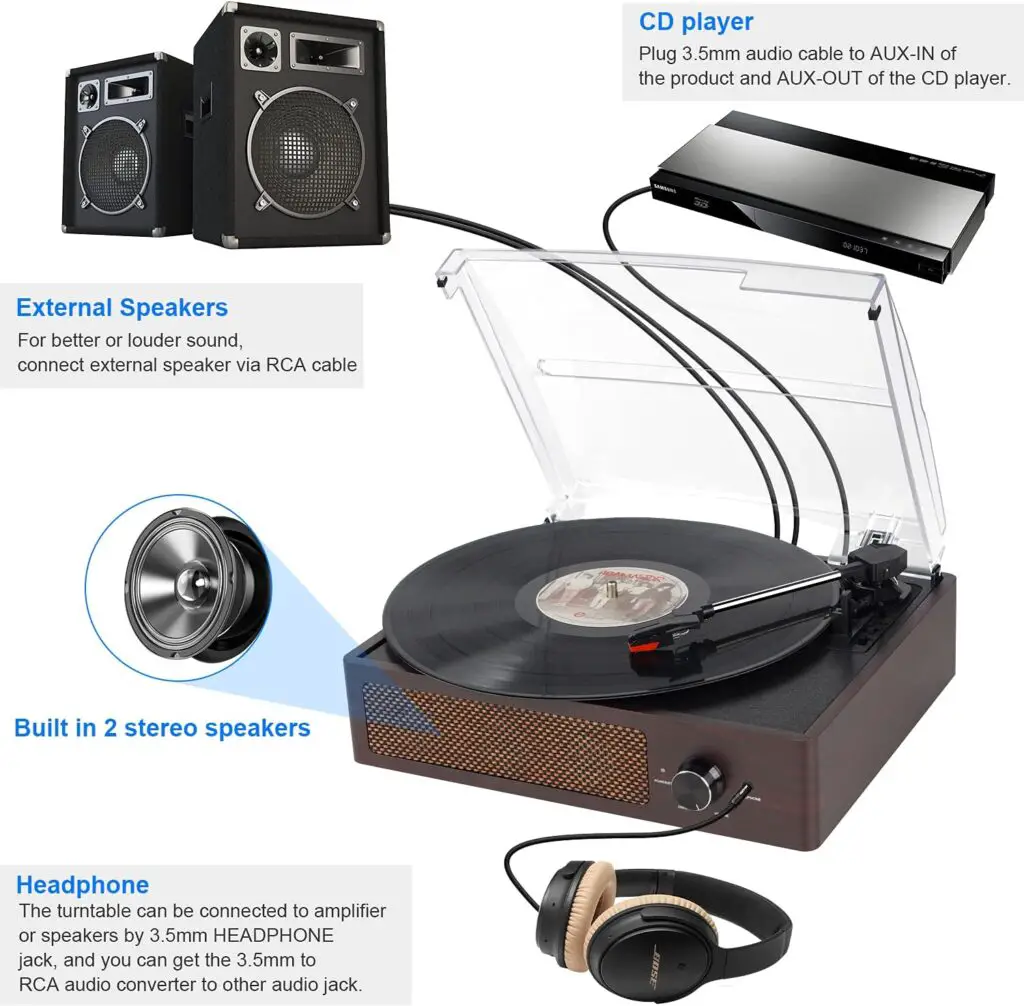
2. Become a cable wrangler: Connect one pair of RCA cables from your audio source (for instance a turntable) to the “Tape Out” ports on your equalizer’s Line In ports.
Image credit: Wikihow
3. Repeat the feat: Grab another pair of RCA cables and connect the “Line Out” ports on your equalizer to the Aux In ports on your receiver or amplifier (where your speakers reside).
4. Flip the switch (or button): Engaging the “Tape Monitor” function on your receiver/amp will ensure audio passes through your equalizer before reaching your speakers.
5. Source switch symphony: Now you can effortlessly switch between turntable and cassette deck, knowing your equalizer will faithfully shape their sounds!
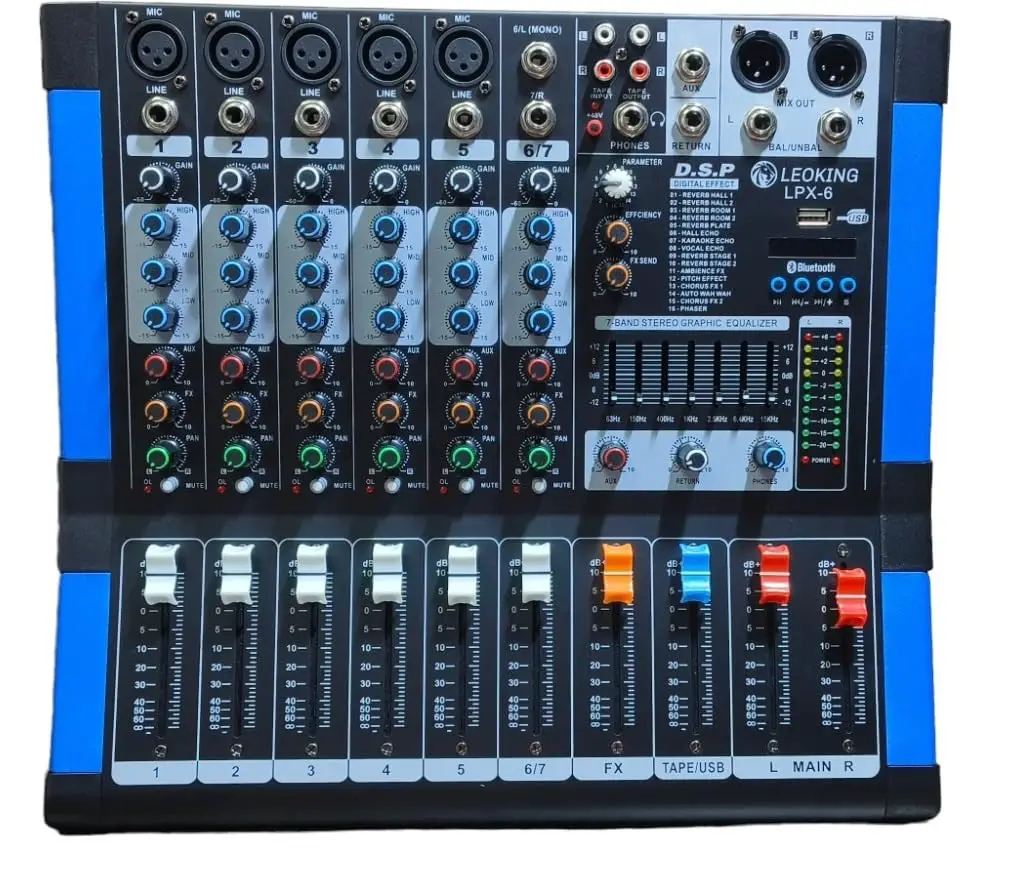
The Multi-Source Multitude:
Have multiple audio gremlins that need equalizing? No worries; most equalizers feature multiple input options such as dedicated “CD In” or “Phono” ports to meet this need. Simply follow these steps for each source to connect it to its designated input on the equalizer; don’t forget to engage the appropriate monitoring function on your receiver/amp, like CD Monitor for each source!
Advanced Techniques:
Feeling adventurous? Here are a few ways you can unleash even greater creativity with your equalizer:
1. Channel Mixing: With multiple equalizer channels available to you, each can be dedicated to different sources, then used to combine their levels prior to sending them directly to your speakers.
Image credit: Amazon
2. Source-Specific Equalizing: Are you looking to boost the bass on your turntable while keeping vocals crisp on your CD player? Use a switcher to connect each source to its own equalizer and engage the one of choice accordingly.
Image credit: Amazon
Bonus Tip: Label your cables! Doing this will save time when trying to decipher several sources in an audio listening session.
With these tips and some cable wrangling, you’re bound to become an expert at multi-source equalization in no time! Understanding input/output flow as well as making use of monitoring functions on your receiver/amp will enable you to master multi-source equalization quickly! So get out there, connect, and conquer the sonic spectrum with your multi-source equalizer!
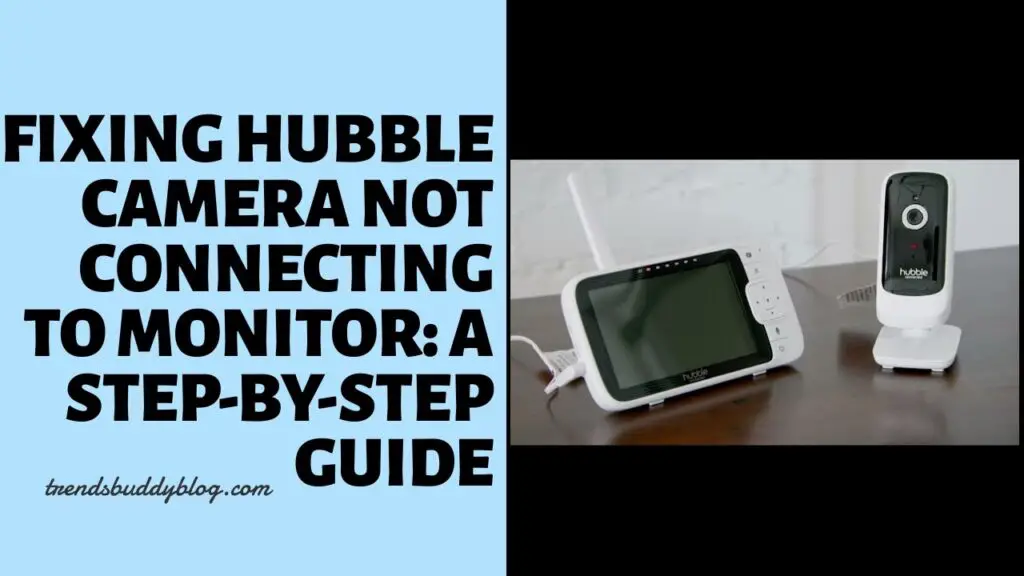
Hubble cameras make great home surveillance options, but sometimes they have difficulty connecting with their monitors. Don’t panic if this occurs – here are steps you can follow to fix it: make sure both devices are powered on and connected to Wi-Fi; reboot both simultaneously until the problem goes away; if that fails contact Hubble customer support immediately for help.
1. Check the compatibility of your camera and monitor: Find a list of compatible devices by visiting [Hubble Connected Support]. If none of your current cameras or monitors work together, consider purchasing new cameras/monitors that do work together seamlessly.
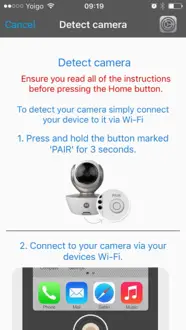
2. Hard reset your camera: Resetting will erase any prior pairing information and restore your camera back to factory settings. To do this, hold down the “Pair” button on the back of the camera while turning it off and on again while still holding down “Pair”, until a flashing blue light indicates it is ready to pair with new devices.
Image Credit: Hubble
3. Connect your camera and monitor to the same Wi-Fi network: Hubble cameras only support connecting to the 2.4GHz band, so if your router offers multiple bands it is imperative that both monitors are also connected to it. You can check this by pressing Menu > Wi-Fi on your monitor; here you should see your network name and signal strength displayed; if this information doesn’t appear you may need to scan available networks before selecting yours or move closer or use an extender device if signal strength decreases too quickly.
Image Credit: Amazon
4. Change the input source on your monitor: Sometimes monitors do not automatically recognize cameras; to do this, manually selecting an input source from its menu can help. Pressing the Menu button and choosing Input displays a list of available input sources (HDMI, VGA and USB are among others), from which you must choose one matching your camera connection – for example if your camera connects through HDMI this would require selecting that as the input source.
5. Restart your camera and your monitor: Refresh your connection and resolve any temporary issues by switching off both the camera and monitor, waiting a few seconds, then powering them both back on. A green light should illuminate on the camera to indicate its connection with the monitor; and live video feed from it should appear on its monitor screen.
6. Make sure your monitor is within 30 feet of your camera: Bluetooth signals may become weak or blocked by metal objects or walls if devices are too far apart, to improve Bluetooth connections you should move your camera or monitor closer together and remove any obstacles which interfere with it.
7. Refresh your camera list in the Hubble app: Hubble app on your phone or tablet and tapping on the “Cameras” icon at the bottom of the screen may help update the status of your camera to indicate it as being online. Pull down on camera list using finger and you should see green dot next to name of camera which indicates its online status; live feed should also be visible.
Image Credit: Hubble
8. Turn the camera off and on again: Restarting the camera may help reset and establish a new connection. To do this, press and release the ‘Power’ button on the back of the camera before waiting several seconds and pressing again – you should see a blue flashing light indicate readiness to pair, as well as receiving a message to press the ‘Pair’ button within 60 seconds and complete pairing process – beeping sound will indicate connection, with green lighting showing on camera as proof and live video feed displayed on monitor screen.
Follow this comprehensive step-by-step guide, and most Hubble camera monitor issues should be resolved quickly and easily. However, if any challenges persist don’t hesitate to reach out the [Hubble Connected Support] team as their expert service can offer additional diagnostics and tailored solutions to ensure that your smart home surveillance system runs seamlessly.
How can I reset my Hubble camera?
Resetting your Hubble camera may help resolve various issues, including connectivity or software glitches. While the specific reset procedure depends on your camera model, here are the general steps:
1. Locate the “Pair” button – usually on either the back or underside of your camera.
2. Disconnect the camera from power.
3. Press and hold the “Pair” button.
4. While holding down the “Pair” button, reconnect your camera.
5. Hold down the “Pair” button for approximately 10-20 seconds; during this process, the LED light may start blinking or changing color.
6. Releasing the “Pair” button.
7. Wait a few moments for the camera to restart; this may take several minutes.
Once your camera has restarted, its settings must be restored back to their initial defaults.
Hubble camera setup process
Setting up your Hubble camera is a straightforward process that takes just minutes to complete. Here is our step-by-step guide:
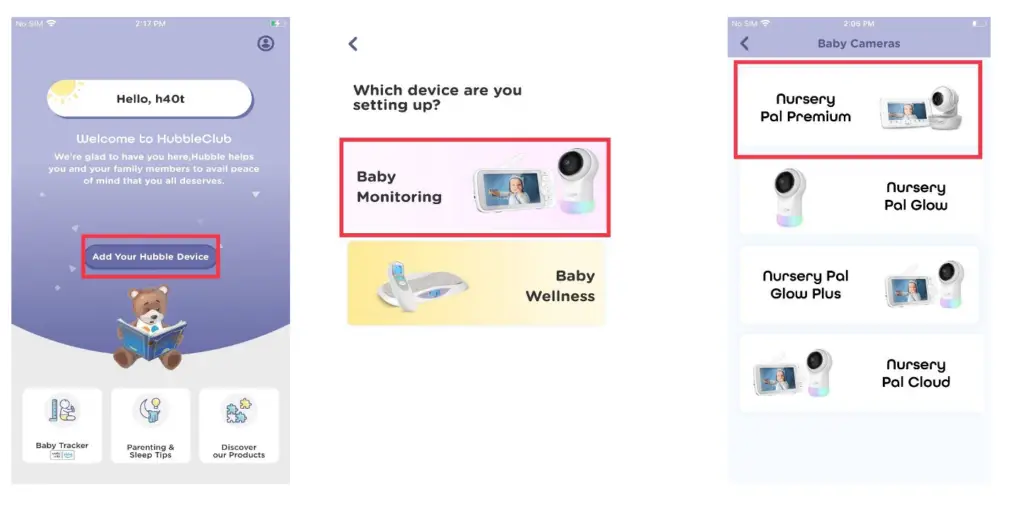
Step 1: Download the Hubble Connected app: Hubble Connected app is available for both iOS and Android devices and can be found on either App Store or Google Play Store for download.
Image Credit: google
Step 2: Open an Account: If you don’t already have an Hubble Connected account, creating one is simple and quick within the app.
Step 3: Connect the camera to power: Plug the camera’s power adapter into an outlet and connect its other end to its power port on the camera.
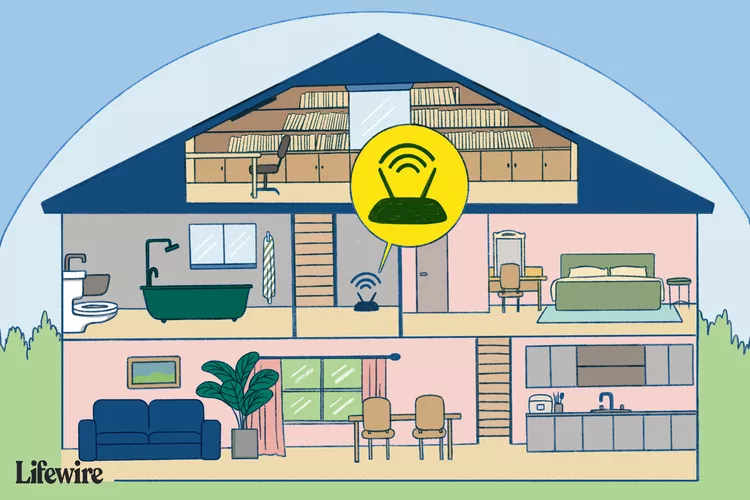
Step 4: Locate and position your camera within range of your Wi-Fi router: For optimal results, place the camera within 10 feet of your Wi-Fi router to connect to the internet. To achieve maximum results, set your Wi-Fi router’s signal strength as low as possible when placing your camera near it.
Image Credit: Lifewire
Step 5: Launch the Hubble Connected app and tap on the “+” symbol to add data points: The “+” icon can be found in the lower-right corner of an app.
Step 6: To add a camera, choose “Add Camera: Start setting up your camera now.
Step 7: Determine Your Camera Model: The app should automatically recognize your camera model; if not, manually choose from among a list of available models.
Image Credit: Hubble
Step 8: To pair, press and hold the “Pair” button on the camera: Hold down the “Pair” button for three seconds until its LED indicator begins flashing, and hold for at least 3 more seconds before releasing.
Step 9: Provide your Wi-Fi network name and password: The app will prompt you to enter your Wi-Fi network name and password, so take care in entering this data accurately.
Step 10: Wait for the camera to connect: The camera will attempt to connect to your Wi-Fi network and may take several minutes before doing so successfully.
Step 11: Choose Your Camera Name: The app will prompt you to give your camera a name that can easily identify it within its user interface.
Step 12: Tap “Finish: Your camera setup is now complete! You may now begin using your Hubble camera.
Imagine you are setting up your projector for an important presentation or relaxing movie night but only to discover that the projected image is upside down. Frustrating, right? But don’t worry, you’re not all alone. Let’s explore the common causes and solutions for an inverted projection screen.
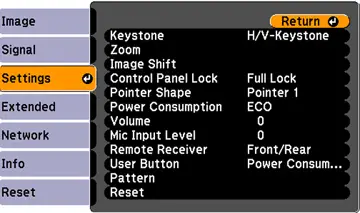
1. Check Projector Settings: First step in solving the problem of an upside-down screen to verify the settings for the projector. In most cases, projectors provide different orientations and modes. If your projector is mounted to the ceiling choosing the ceiling or rear mode may be necessary. If it’s mounted placed on a table, choosing for the front or table mode might be the best option. You can access these options in the menu for projectors beneath “location,” “projection,” or similar choices.
Image Credit: Epson
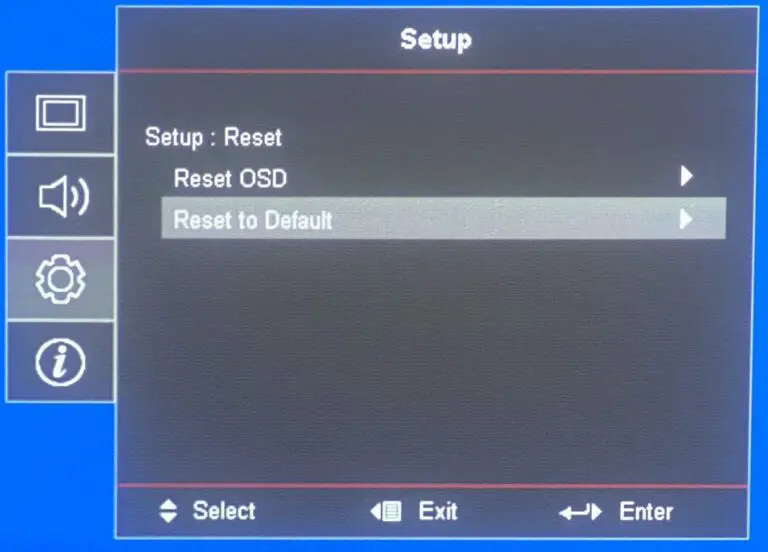
2. Factory Reset the Projector: If changing settings doesn’t yield results the factory reset may be a game changer. Go to the menu for your projector and select options such as “reset,” “setup,” or “utility.” Select “factory reset” or “reset all” to revert the settings to their default settings, potentially fixing the configuration issue that is causing the image to become reversed.
Image Credit: Optvio
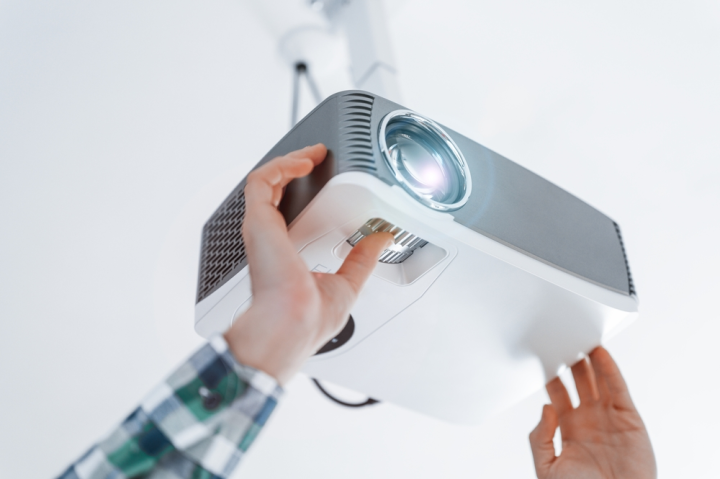
3. Change Projector Lens: Certain projectors are equipped with adjustable lenses that allow users to change the orientation of your image by hand. If your projector is equipped with this feature, you can use the appropriate tool or screwdriver to open the lens, then rotate to ensure that the picture no longer appears upside down.
Image Credit: Istock
4. Reduce Image Size: In situations that software or hardware issues remain, attempt to solve the issue by reducing the size of your image. Bring the projection towards to the screen, or use to zoom. While this won’t fix the cause however it can reduce distortion and improve the image’s quality for a short time.
5. Hardware or Software issues: If none of these strategies prove to be successful You may be confronting more complicated hardware or software problems. In such instances, think about getting help from a professional. It’s essential to look into all possible solutions before deciding that your projector is in need of repair.
In the end, having an upside-down projector screen is a nuisance but it isn’t impossible to overcome. If you check the settings, perform an factory reset, altering the lens, or decreasing the size of your image, you will frequently fix the issue. Be sure to investigate the issue thoroughly and don’t hesitate to seek out professional help if you need to.
To Rotate the Projector Screen Without a Remote: Solutions for Different Projector Models
In the age of technology projection screens have become indispensable for home theaters, presentations as well as other types of applications. But, when there is a need to rotate the screen of the projector without remotes can be an issue. Don’t worry, as we explore practical ways to help make this job easier.
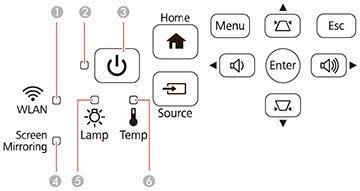
1. Check the Projector Settings: One of the best ways to rotate the screen of your projector manually is to look into the settings of your projector. The majority of modern projectors come with a simple menu that is accessible straight from your device. To start this procedure, simply hit the “Menu” button on the projector and, with the help of arrows go to”Screen”, or the “Screen” as well as the “Image” selection. In the menu, you can seek for“Screen Rotation” or “Screen Rotation” or “Image Flip” option, which allows you to choose the preferred orientation.
2. Utilize the Projector Control Panel: If your projector has controls located on the side or top the screen, changing the rotation of the screen becomes an easy task. The control panel usually houses different settings, with the most popular being the sought-after “Screen Rotation” or “Image Flip” option. You can navigate through these settings by using the buttons on the control panel to get the desired orientation of your screen.
Image Credit: Optvio
3. Tap into the Power of the AV Mute Button: Some projectors have an AV mute button located on the remote or the projector itself, offering an instant solution for image rotation. To use this method, hold and press the AV muted button for a couple of minutes to see the image fade away. Then it comes back in the opposite direction. Repeat this procedure until you get the ideal orientation.
Image Credit: Pinterest
4. Harness Keystone Buttons for Precision: Certain projectors have keystone buttons that are vertical and horizontal created to create the proper image shape. While they are effective, you should be aware that using these buttons for rotation can affect the quality of images and resolution. You can adjust the angles of the corners with keys to get the desired rotation of your screen.
Rotating Your Projector Screen with a Remote
Projectors are now a common thing for making your home movie-watching awesome. Yet their setup process can be intimidating, particularly when it comes to changing screen orientation. If you need help learning how to rotate a projector screen remotely with a remote, look no further – here you will be guided through it with clear steps and expert tips so that every viewing angle is ideal!
Use Projector Menu for Seamless Rotation
Follow these steps to effortlessly change your projector screen:
Step 1. Access the Menu: To access your projector screen’s menu interface, start by pressing the Menu button on your remote control. This will reveal a menu interface on your projector screen.
Step2. Navigating to Image or Picture Option: Once in the menu, use your remote’s arrow buttons to navigate directly to either ‘Image‘ or ‘Picture’ options before pressing Enter to select them.
Image Credit: Epson
Step3. Select Mirror or Flip Option in Image/Picture Settings: In Image or Picture settings, locate and activate ‘Mirror/Flip’ as an option and press Enter.
Step4. Select Projection Modes: Multiple projection modes will be available, such as Front, Front/Ceiling, Rear, or Rear/Ceiling. Choose the mode that meets your set-up requirements best.
Simply follow these steps to effortlessly adjust projection settings and achieve desired rotation, all with just the touch of a button.
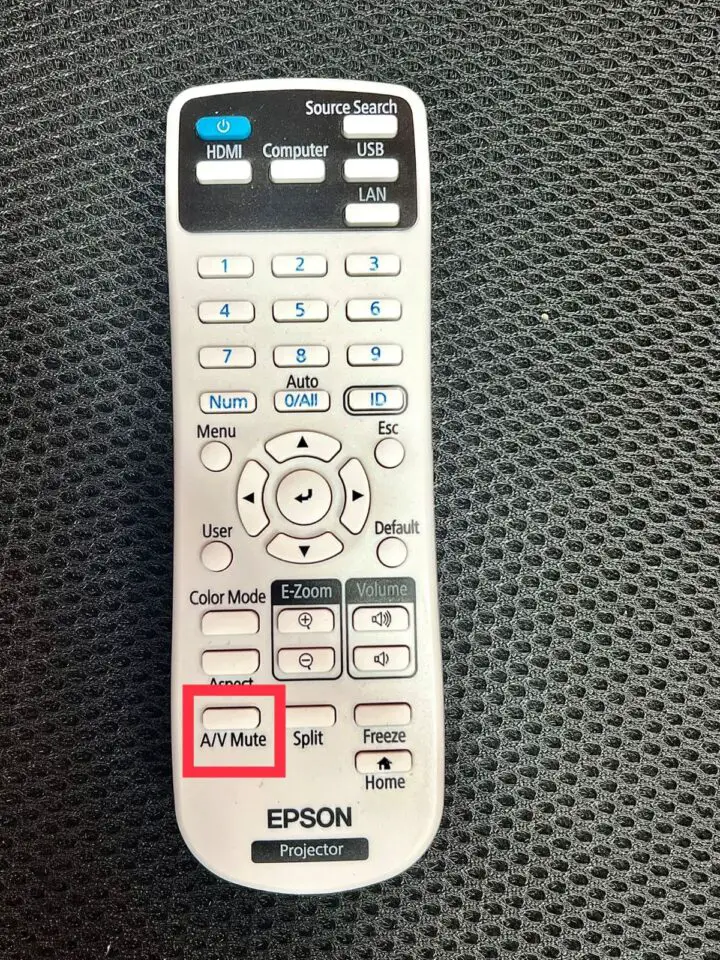
Quick Rotation with A/V Mute Button
For those seeking quick solutions, the A/V mute button on their remote can be invaluable. Here’s how it works:
Step1. Find Your A/V Mute Button: Locate the A/V Mute button on the projector remote to activate A/V Mute mode.
Image Credit: Epson
Step2. Press and Hold for 6 Seconds: To initiate rotation, press and hold the A/V mute button for approximately six seconds before releasing it. This should start the rotation process.
This allows you to switch the projection mode, without going to the main menu. It’s simple and doesn’t take much time.
Use the projector lens
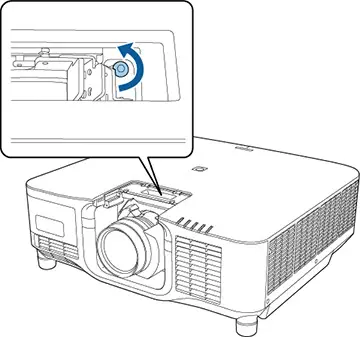
Certain projectors feature rotatable lenses for screen rotation. To use this approach more efficiently, follow these steps:
Step 1. Identification of Rotatable Lens: Check to see if your projector features a lens with rotating capabilities – this feature is often found on advanced models.
Step 2. Loosen the Lens: If your projector features a rotatable lens, use a screwdriver or wrench to loosen it.
Image Credit: Epson
Step 3. Rotate to Align: Once loosed, rotate the lens until its projected image appears as you desire.
This method lets you move the projector around to adjust the image on the screen.
Conclusion Whether you prefer the ease of using the projector menu, quick adjustment of A/V mute button or hands-on precision of projector lens – these methods of rotating your projector screen ensure an easy experience.
How To Flip Projector Image Upside Down – All Brands Guide
Your projector might be giving an upside-down image, leaving you in an uncomfortable spot and in need of solutions to flip it back the right way – don’t fret; we have your needs covered with this comprehensive guide on the various methods to reverse projector images spanning all brands!
Methods for Flipping Projector Images
1. Have You Explored the Projector Menu: Have You Discovered All Its Secrets. Ever been curious as to what lies within the menus of a projector? Flipping an image upside down is simple with its Menu button on either your projector’s remote control or itself: simply navigate to “location,” “projection,” or “mount,” switch from Ceiling/Top to Front/Table orientation or vice versa and switch the orientation setting there, et voila: your image orientation now corresponds with its location!
2. Factory Resetting the Projector: If the menu route seems confusing or does not produce results, don’t despair; factory resetting may be your solution. Navigate to the projector menu, locate “reset,” “setup,” or “utility,” then “factory reset” or “reset all.” This step serves as a reset button for configuration issues causing upside-down woe.
Be mindful, however, as these steps can depend on the brand and model of your projector. For guidance, consult your user manual.
How Can You Split One Projector into Two Screens?
Here are a few possible methods of splitting one projector into two screens, depending on its type and what devices you wish to connect. Here are a few:
1. Apply a Splitter: A splitter is a device that converts single inputs to multiple outputs. In order to divide one projector into two screens, an HDMI splitter may be needed. With it connected two HDMI devices such as laptops, DVD players or game consoles – and connected via their inputs on the splitter – its output connects directly with your projector’s HDMI port; you will be able to display both devices on either side of your projector screen either side by side or picture-in-picture mode!
Image Credit: startech
2. Use the Split-Screen Feature: Some projectors come equipped with an inbuilt split-screen feature that enables you to display two distinct sources on one screen at once. For instance, connecting a laptop and USB drive together could allow for two sources on a single display screen; using either remote control or menu settings activate the split-screen mode and adjust size/position accordingly.
Image Credit: Epson
3. Use the extend display option: If you want to separate screens between your computer and projector, using Windows or Mac’s “Extend Display Option” can be useful. This feature allows two independent displays on either screen allowing you to show different content across both screens. In order to use it successfully, connect your projector using either VGA or USB cables and adjust display settings accordingly – choosing which screen as your main one and rearrange displays as you see fit.
InFocus Projector Troubleshooting
Troubleshooting InFocus projectors is often straightforward if you follow these steps. Here is an extensive guide that can help identify and address common issues with an InFocus projector:
General Troubleshooting Steps:
1. Check Connections: Make sure that all cables, including power cord, video cables and audio cables, are securely connected to both the projector and source device. Inspect them for any damage or bent pins.
2. Power Supply: Verify that the projector is connected to a working electrical outlet. Connect it directly to a wall outlet instead of using a power strip if possible; otherwise if it still does not turn on, inspect its power cord for any signs of wear and tear.
3. Input Source: Make sure the appropriate input source is selected on your projector by using its input button on either its remote control or keypad to cycle through available input sources.
4. Lamp Status: Check the lamp status indicator on your projector; if its light indicator shows red or blinks rapidly, that could indicate it needs replacing.
Image Credit: Epson
5.Lens Cap: Make sure the lens cap has been removed from the projector.
Image Credit: Epson
6. Overheating: If the projector becomes overheated, it may shut itself off automatically. Give it time to cool off before checking if its vents are free from obstruction.
Specific Troubleshooting Issues:
No Input Found:
1.Improper Device Connections: Check that your input device is connected to the appropriate input port on the projector. Try connecting via an alternative cable or connection method.
2. Device Compatibility: Verify the input device meets the input resolution and refresh rate requirements of your projector.
Image Credit: viewsonic
3. Source Device Settings: Check the settings on the input device, such as its video output mode or resolution.
Device Fails to Turn On:
1. Faulty Power Cord: Try swapping out your power cord to rule out potential faults in its construction.
Image Credit: Istock
2. Power Supply Issues: Check that the power supply unit is working as designed. If your projector is still covered under warranty, reach out to InFocus support for further assistance.
Audio Distortion:
1. Loose Audio Connections: Verify that audio cables are securely attached to both the projector and audio source.
2. Audio Source Settings: Adjust the audio settings on both the input device and projector itself.
Image Credit: Epson
3. Faulty Speakers: If the distortion persists, it could indicate an issue with the projector speakers and should contact InFocus support immediately for assistance.
Image Quality Issues:
1. Focus Adjustment: Utilize the focus control on the remote or projector to sharpen your image.
Image Credit: Amazon
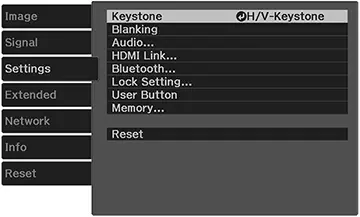
2. Keystone Correction: Change the settings for keystone correction of the projector in order to make sure the image is aligned properly.
3. Image Source Resolution: Make sure the input device is able to output the proper resolution required by the projector.
4. Lens Cleaning: In the event that your image looks to be dusty or dirty, wash the lens of the projector with an easy, non-lint cloth.
Additional Tips:
1. Consult User Manual: Check the user’s manual for your particular InFocus projector model to find detailed troubleshooting guidelines as well as error code.
Image Credit: yumpu
2. Firmware Updates: Make sure you are aware of any update to the firmware of your projector as they may fix known problems and enhance performance.
Image Credit: Imobie
3. Contact InFocus Support: If the steps for troubleshooting above don’t solve the issue, you can contact InFocus support to receive further assistance.
If you’re planning to build an enclosure for subwoofers to provide deep bass, it is important take into consideration a number of aspects like the dimensions and power of the subwoofer, the design and style of enclosure, and also the positioning and the tuning to the setup.
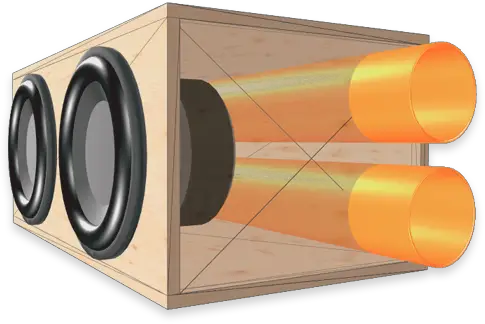
One of the most effective designs of subwoofer boxes to provide high-end bass performance is the portable enclosure that allows air to flow into as well as out of the enclosure through the vent or pipe. This increases the low-frequency performance and effectiveness that the subwoofer produces. But, you must ensure your port’s measured and tuned to the specifications of the subwoofer and the quality of your preferred sound.
To build a portable subwoofer box that can be used for deep bass, you’ll require some tools and materials for example:
Medium-density fiberboard (MDF) boards
Jigsaw or circular saw
Drill
Screwdriver
Wood glue
Fiberglass resin
Subwoofer
Wire
Terminals
Step 1: Determine the Subwoofer’s Specifications
Before beginning construction of your box, it is necessary to gather information regarding the subwoofer you will use. Gather information such as its manufacturer, frequency range, and specifications.
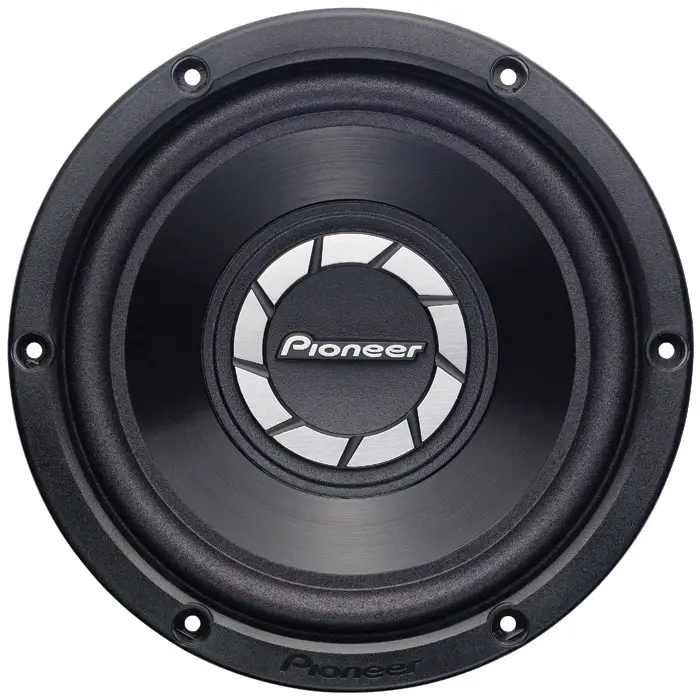
1. Subwoofer size: Subwoofer box sizes will depend upon the diameter of their driver unit.
2. Subwoofer type: Subwoofer types such as ported and sealed require different enclosure requirements.
Image credit: Amazon
3. Subwoofer mounting depth: Mounting depth will determine the minimum depth of a subwoofer box.
4. Subwoofer power handling: Power handling will assist in selecting an appropriate size box.
Step 2: Choose the Enclosure Type
There are two primary subwoofer enclosures: sealed and ported. Sealed boxes tend to produce tighter bass tones while larger ported subs can produce deeper, more resonant low frequencies.
1. Sealed boxes: Sealed boxes are the easiest type of enclosure to construct and are an ideal choice for subwoofers designed for tight and punchy bass sound reproduction. Sealed boxes also reduce distortion at higher volumes.
2. Ported boxes: Ported boxes are designed to extend the frequency response of subwoofers, creating deeper bass sounds with increased resonance. However, they can also be more difficult to build and more likely to distort at higher volumes.
Image credit: Amazon
Step 3: Determine Box Volume
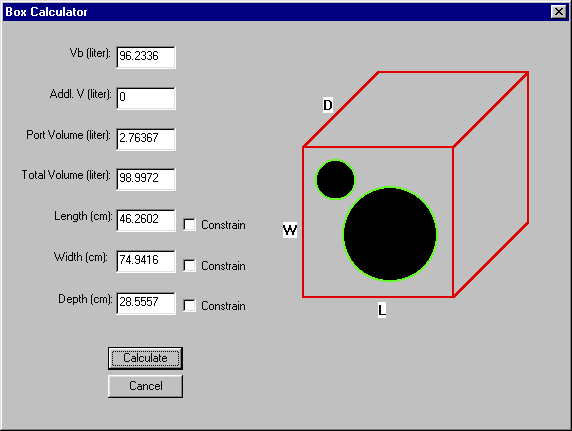
Volume is one of the key factors affecting sound quality from subwoofers. You should aim for keeping within its recommended range; to do this you can use an online subwoofer box calculator.
Image credit: Ajdesigner
Step 4: Design the Box
Once you know the volume of the subwoofer box, the next step should be designing it to accommodate both its contents and available space. In terms of aesthetics, be mindful that any design changes to it might affect visibility within your vehicle or listening area.
Step 5: Build the Box
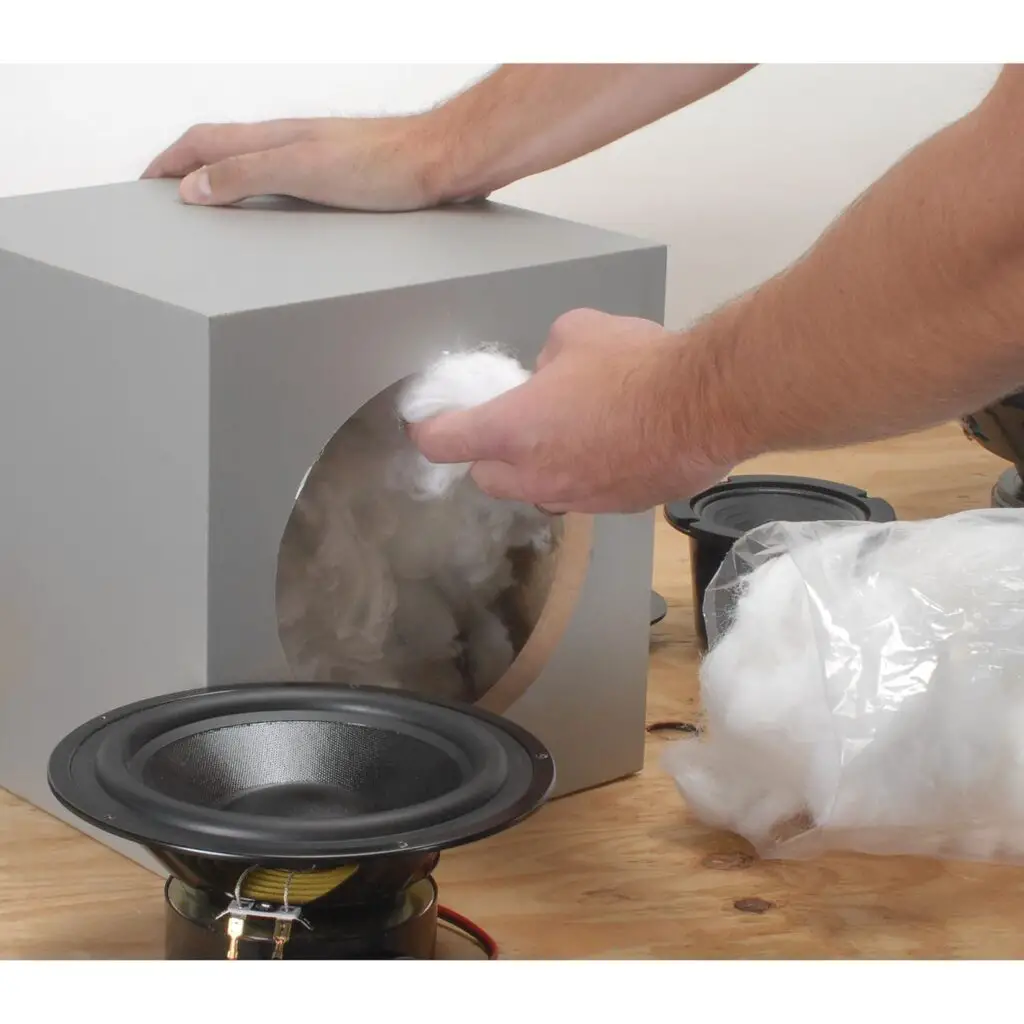
Once you have designed a box, the next step should be building it. Use various materials like MDF, plywood or fiberglass when building your enclosure – be sure to round over its edges using a router so as to prevent damage to your subwoofer while simultaneously improving sound quality.
Step 6: Install the Subwoofer
Once the box is completed, you can install your subwoofer according to its manufacturer’s instructions for installation.
Image credit: Amazon
Step 7: Test the Box
Once your subwoofer is installed, it is important to test its box to ensure it produces the desired sound quality. Use a subwoofer box tester to examine its frequency response.
Additional Tips:
1. Use only high-grade materials when crafting the box.
2. Make sure the box is airtight.
3. Reinforcing the box requires bracing.
4. Utilize damping material to decrease internal reflections.
Image credit: Amazon
5. Make use of a subwoofer enclosure calculator to identify an ideal box volume for your subwoofer.
Image credit: subbox
6. Check your box to make sure it produces the desired sound quality.
Build your own subwoofer box for deep bass can be both exciting and satisfying, by following these steps you can produce an enclosure capable of producing the deep, resonant bass sound you desire.
What is the difference between a sealed box and a ported box?
A sealed box and ported box differ in their ability to affect bass sound quality and size of enclosure; while a sealed box provides airtight protection for your subwoofer. A ported box features holes or vents which permit air flow in and out. Here are some key differences:
1. Sound Quality: A sealed box produces tighter, more accurate and precise bass sounds; in comparison, ported boxes produce louder, boomier bass tones which may or may not be accurate. A sealed box works best for music that requires clear and detailed bass tones like jazz, classical or acoustic while rock, hip hop or EDM prefer powerful deep basses such as sealed boxes can produce.
2. Box Size: When considering box size options for installations with limited space constraints, sealed boxes tend to be smaller and more compact than their ported counterparts, offering more compact solutions while producing louder bass with reduced power requirements. A ported box requires more air space but produces louder, more powerful bass at greater volume levels.
Image credit: Amazon
3. Power Efficiency: A sealed box requires more power from an amplifier to produce equal volumes of bass; in contrast, ported boxes require less. While they are more power-efficient overall, ported boxes may require more precise tuning and may only work well with specific subwoofers.
Image credit: Amazon
Can I use other materials besides MDF to build a subwoofer box?
Yes, other materials besides MDF are suitable for building subwoofer boxes; each material offers advantages and drawbacks.
1. Plywood: Plywood is a more cost-effective and lighter material than MDF, yet less rigid and susceptible to resonance. However, this makes it suitable for outdoor or marine applications due to being more moisture resistant than MDF – although an uneven surface could make working with it difficult.
Image credit: Istock
2. Particleboard: Particleboard is an inexpensive alternative to MDF or plywood, yet less durable and consistent. Composed of wood particles mixed with resin and compressed into sheets, particleboard can make use easier as it’s light and inexpensive – though may result in poor bass response or shorter lifespan.
3. Fiberglass: This synthetic material allows for custom shapes and sizes, but can be costly and tricky to work with. While fiberglass offers strong and lightweight boxes, building them may require additional tools and skills as well as possibly having health risks due to resin fumes released into the environment from manufacturing process.
4. Standard Wood: Standard wood is an aesthetic material, yet heavy and variable in quality. Although it can create sturdy boxes that look beautiful, temperature and humidity changes may affect it and require additional finishing or painting processes in order to protect from potential damage.
5. Sonotube: Sonotube is a simple cardboard tube subwoofer box design option that is both affordable and limited in design. While sonotube may provide adequate sound quality and performance, it may not offer optimal audio performance or protection from water and fire damage.
Image credit: Amazon
6. Polycarbonate: Polycarbonate plastic material makes for stunning subwoofer boxes, but is costly and difficult to cut. While its clear look offers modern appeal, building one may require special tools and techniques due to its thin nature and fragility; additionally it could have potential acoustic drawbacks due to being thin and fragile.
As can be seen, no single material makes an ideal subwoofer box material; when selecting one for your project it should take into account factors like budget, preferences, and goals.
Can I paint my subwoofer box?
You are able to paint the subwoofer’s box to make it look more attractive and complement the style of the interior of your vehicle. It is important to choose the appropriate paint and use the correct procedures for preparation and application for a durable and pleasing appearance.
Paint Selection:
1. Water-based Paint: Select water-based polyurethane or enamel paint as these paints are not as volatile, and release less fumes than oil-based paints. Beware of paints with solvents since they may harm the subwoofer’s foam surround.
2. Subwoofer Box-Specific Paint: Specialized paint for subwoofers is specifically designed to resist the vibrations and humidity that are associated with subwoofer operation. It offers better adhesion and endurance.
Surface Preparation:
1. Sanding: Make sure to thoroughly sand the surface of the subwoofer box by using fine-grit sandpaper (120-220 grit) to get rid of any imperfections smoothing out the edges and create a an ideal surface for paint to stick.
Image credit: Amazon
2. Cleaning: Make sure to thoroughly clean the surface using a mild detergent and water to get rid of any dust or other debris. Let it dry completely before moving on.
Application and Finishing:
1. Primer application: Install a top-quality primer that is specifically designed to be used on subwoofers. This aids in sealing the wood, and creates an even surface for paint to stick to. Apply two coats in thin layers that allow each coat to fully dry.
2. Paint application: Select a spray paint or brush that is of the highest quality to apply. Spray cans give you more control and uniform coverage and are ideal for small details and intricate designs.
3. Multiple coats: Apply multiple thin coats of the paint you want to use and let each coat fully dry prior to applying the following. This gives you a full and even look.
4. Protective Topcoat: You may want to apply a clear-coat sealant or lacquer in order to shield the painted finish from scratch marks, fade and moisture. This will give you a long-lasting as well as a long-lasting, durable finish.
Image credit: Ebay
Additional Tips:
1. Do your work in a well-ventilated Space: Avoid painting in closed spaces to reduce the exposure to paint fumes. Utilize a respirator when needed.
2. Protect your surroundings: Cover the car interior or work area with newspapers or drop cloths to stop paint splashes from splattering.
3. Allow for Proper Drying Time: Allow ample time for each coat of sealant and paint to completely dry before making use of the subwoofer or handling device.
Following these guidelines and using premium materials, you can easily paint your subwoofer’s enclosure to create a an individual and fashionable design for your car’s interior.
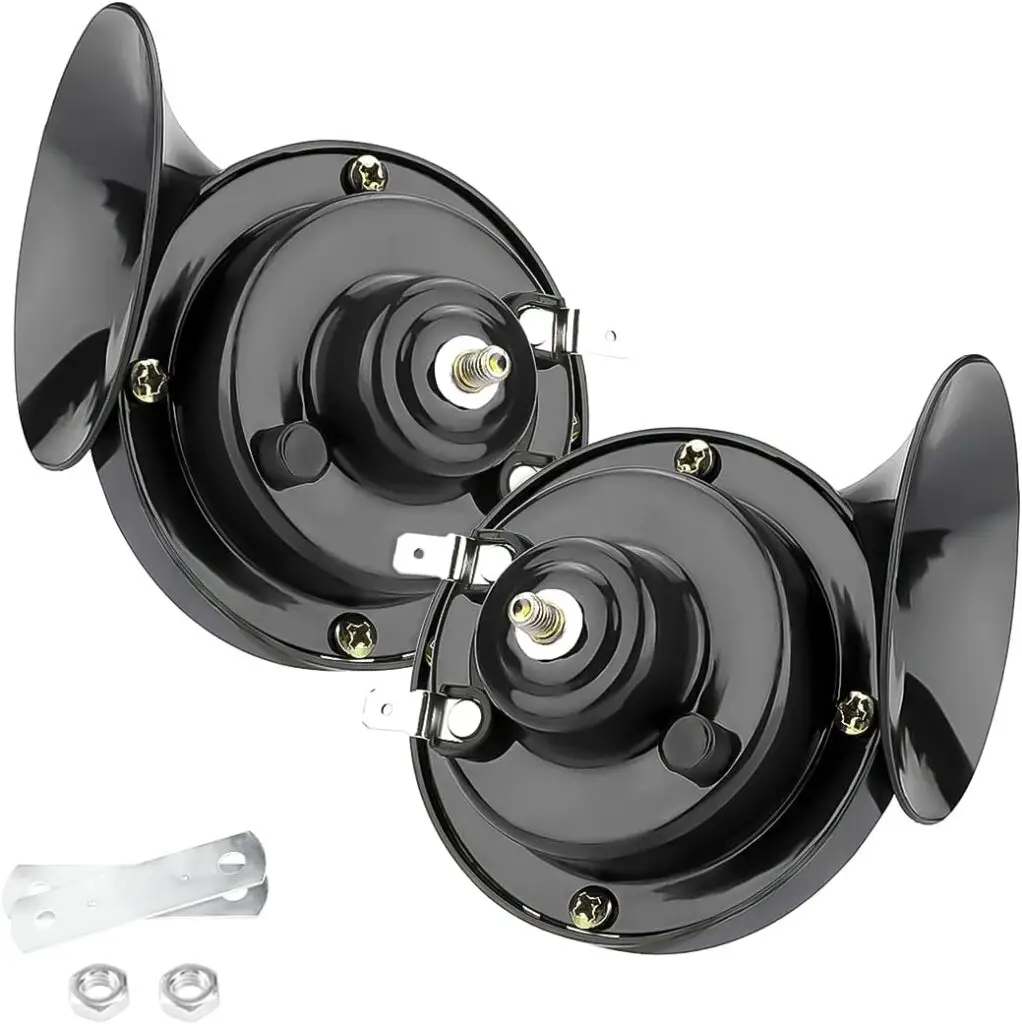
Imagine you’re in an instance where you have to notify others driving around, but the car’s horn makes only a sluggish sound. Frustrating, right? A car horn that is not working properly can cause safety hazards in that it hinders the ability of communicating effectively when driving. This blog will look at the many reasons for an ineffective car horn, and show you the best way to handle these issues.
There are many possible reasons for the sound of the car horn to be weak for a weak horn, for example:
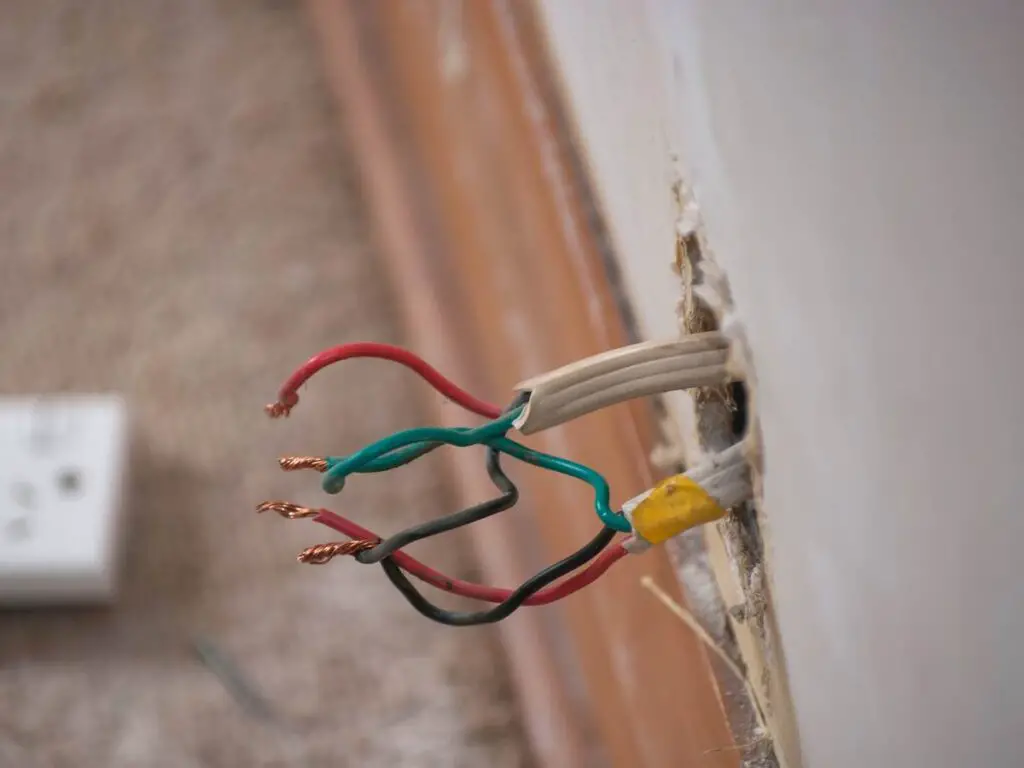
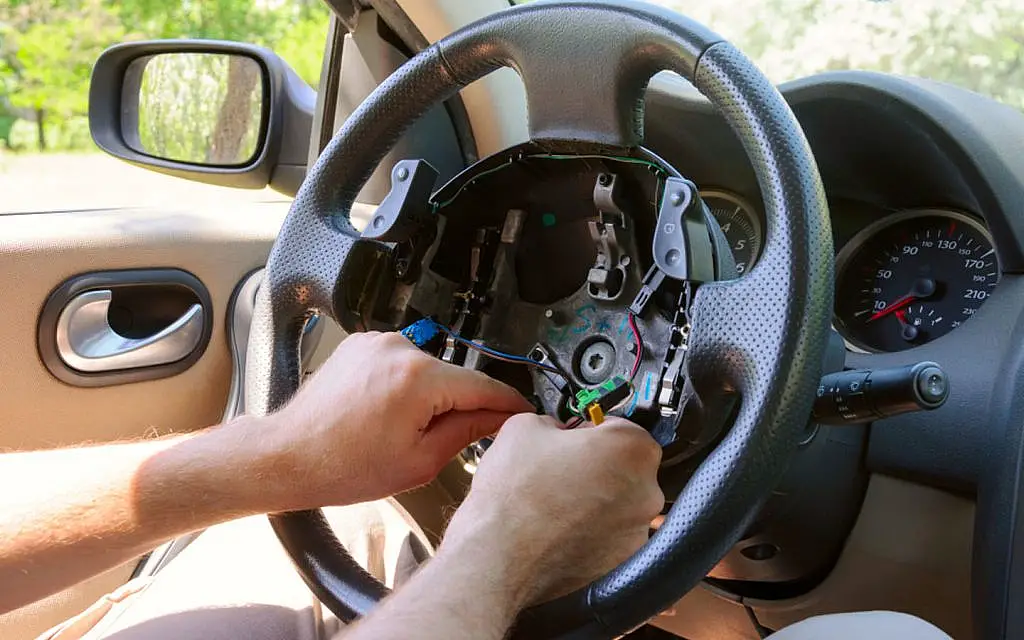
1. A bad horn switch: The horn switch is the button on the steering wheel that activates the horn. If the switch is worn out or damaged, it may not send a strong enough signal to the horn, resulting in a weak sound. You can test the horn switch by using a multimeter to measure the voltage at the horn when you press the button. If the voltage is low or zero, the switch may be faulty.
Image credit: istock
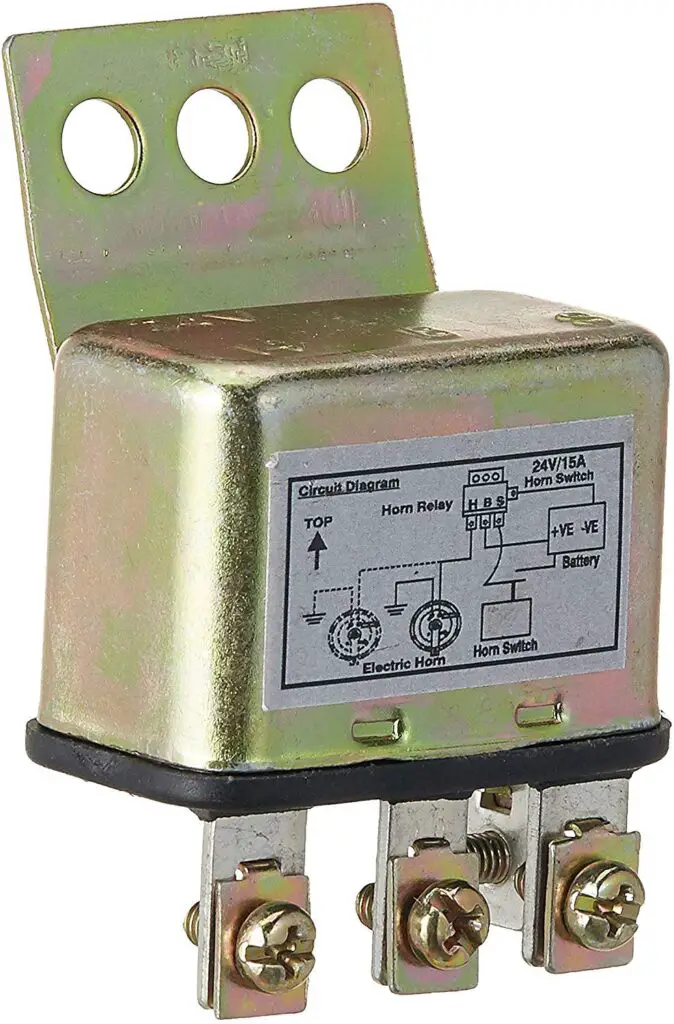
2. A faulty horn relay: Horn relays are electrical devices used to switch the power to your horn on and off. If one malfunctions, however, it could fail to provide adequate power to the horn, producing weak sound quality. You can test horn relays by swapping out their location within your fuse box with another relay of similar type; if sound improvement results, this may indicate that one may be defective.
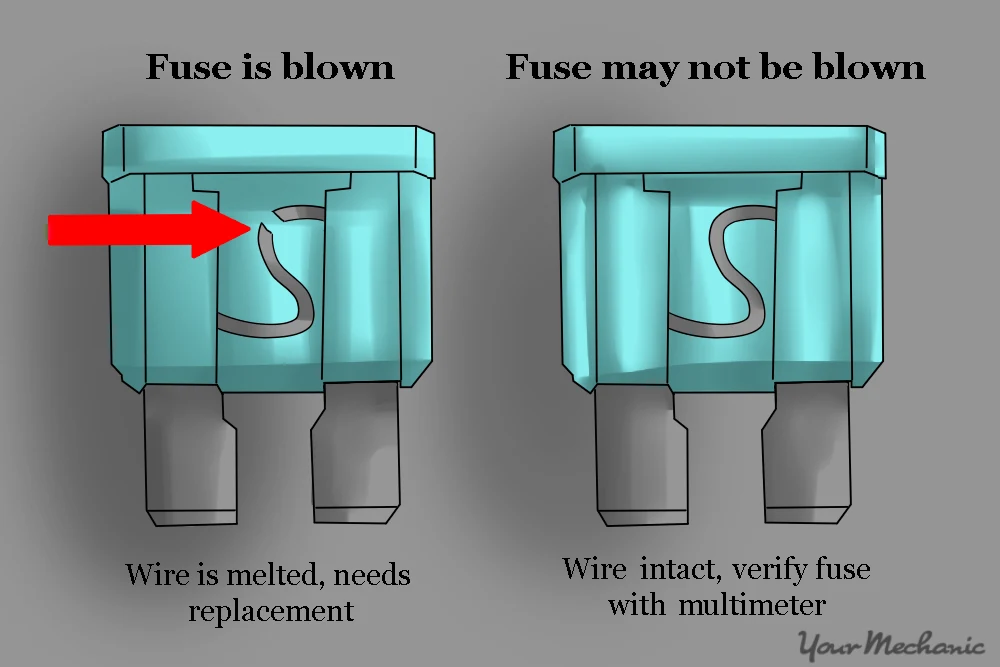
3. A blown horn fuse: The Horn fuse is a safety device that keeps the horn away from drawing too much current, which could damage an electrical circuit. In the event that the fuse is damaged it will shut off electric power supply to the horn which results in no noise or low sound. It is possible to can check the horn fuse by finding the fuse in the box for fuse, and then determining whether it is in good condition. If it is damaged, you will need be replacing it by a brand new one of the same rating.
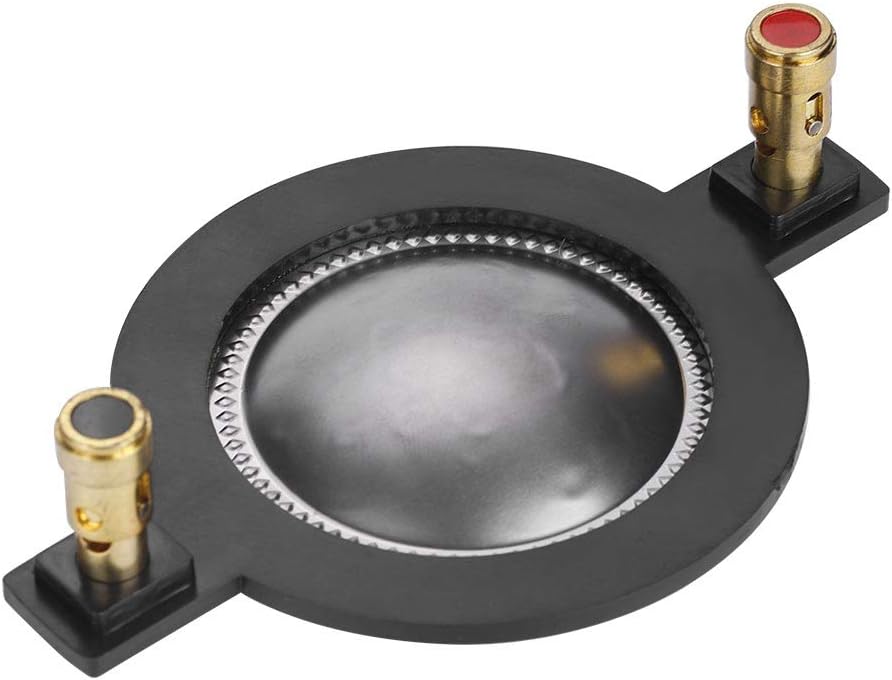
Image credit: yourmechanic
4. Damaged speaker cones: The speaker cones of a horn are responsible for producing sound. If they become damaged, however, their vibration may become compromised and cause weak sounds to be produced by them. You can test these speaker cones by taking steps such as taking out your car horn to inspect for cracks, holes or corrosion damage – and replacing it if needed.
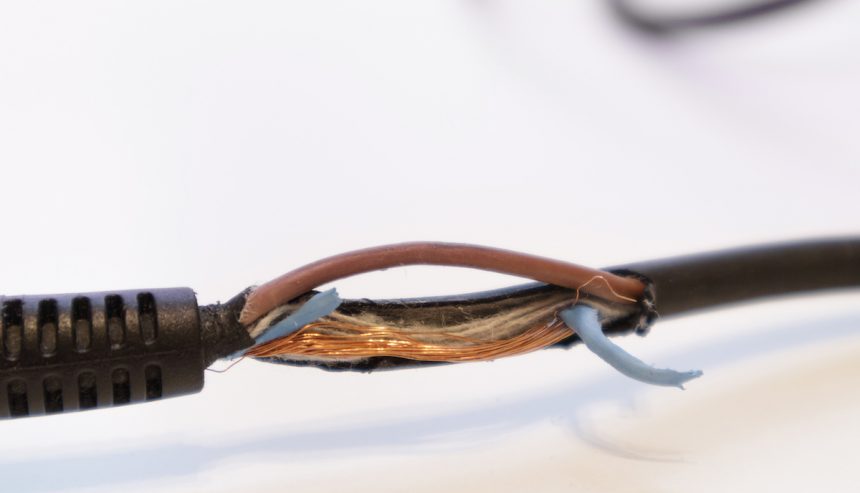
5. A wiring issue: Wiring issues involve problems with the electrical wires connecting a horn to its battery, switch, relay, or fuse. If any wire is loose, broken, corroded, shorted or short circuited it may not provide sufficient power for sound production; you can test this by using a multimeter to measure continuity and resistance of each wire – and if found faulty repairs should be undertaken as soon as possible.
Image credit: istock
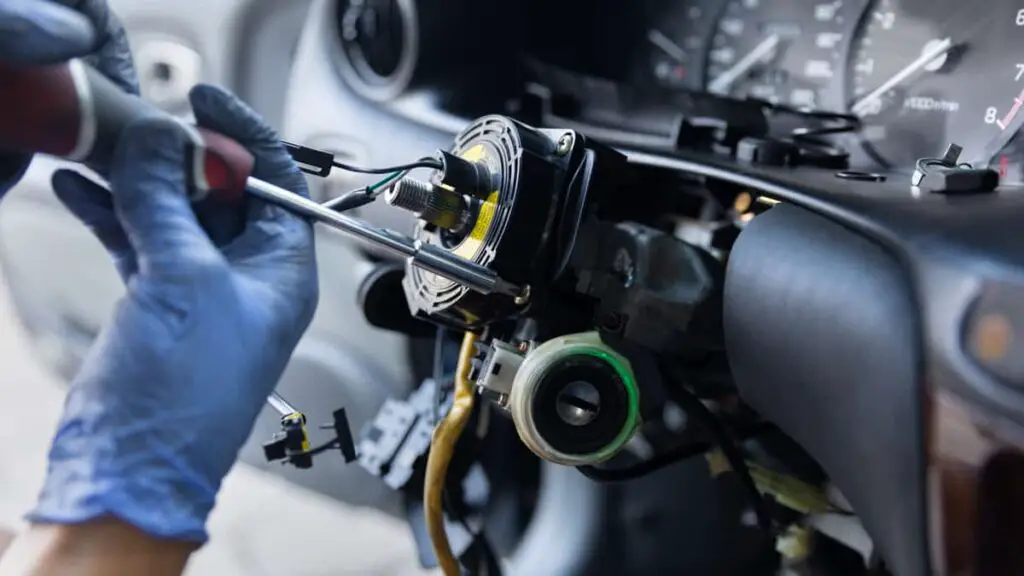
6. A broken clock spring: The clock spring is a coil of wire connecting a horn switch to an electrical system and allows steering wheel movement without disrupting electrical connections. If broken, this spring could prevent signal transference from switch to horn, creating a weak sound from the horn itself. You can test for its integrity by using a multimeter to measure wire resistance; high resistances indicate possible clock spring failure.
Image credit: istock
These are only some of the main causes for why your car’s horn may sound weaker than usual. I hope this guideline can help you diagnose and resolve this problem on your own; otherwise if additional assistance is required please seek professional services or visit a repair shop for your car.
How do you know if your horn relay is bad?
There are various methods you can use to tell if your horn relay has gone bad, with symptoms being such as:
1. Horn Doesn’t Work at All: This is often an indicator that your relay has become defective, since pressing its button and nothing happens is likely an indicator that power is not reaching it.
Image credit: istock
2. Horn is Stuck On: An obvious sign of a malfunctioning horn relay, when its horn remains persistently on, could be that its relay has become stuck in its closed position, sending power directly to it and maintaining power flow to it.
3. The horn is intermittent: This indicates that your relay may be weak and could potentially fail, and means your horn works sometimes, but not always. This could indicate a relay’s weakness and potential failure.
Image credit: Amazon
4. The horn is weak or sounds distorted: A relay may not be sending enough power to the horn, as demonstrated here.
Image credit: Amazon
If you are experiencing any of these symptoms, it is likely that your horn relay is damaged and needs replacing. You can either test the relay yourself with a multimeter or take your car in for diagnostics from a mechanic.
Here are some guidelines for testing your horn:
1. Find the Horn relay: The horn relay is typically underneath the bonnet of your vehicle, near the fuse box. It is possible to can determine exactly the location for the relay by looking through your vehicle’s owner’s manual.
Image credit: Amazon
2. Remove your battery: Before you start testing the relay it is crucial to unplug the battery in order to stay clear of electrical hazards.
Image credit: Halfords
3. Take the relay out of the fuse box: Once the battery is removed the relay can take the relay out of the box.
Image credit: Amazon
4. Check the condition of your relay using the aid of a multimeter: You can use a multimeter to check the resiliency that the coil of your relay as well as contacts. When the coil is open or the contacts are connected and the relay is not working, it is defective and must be replaced.
If you are not confident in conducting the test yourself You can bring your vehicle to a mechanic and have it checked for you.
How can I make my car horn louder?
There are various techniques you can employ to give your car more of a booming sound, depending on your own personal preferences and budget. Here are a few options you should consider:
1. Adjusting your car horn: Certain car horns come equipped with an adjustment dial on their side that can be turned using a flathead screwdriver to raise their volume. To accomplish this, first disconnect the grounded wire of your battery in your car, find and take off away from its mounting bracket, examine it closely in search of an adjustment dial that allows you to increase or decrease volume as desired, then rotate clockwise until your desired volume has been achieved before reconnecting your horn to its mounting bracket and testing its sound output.
Image credit: Amazon
2. Replacing your car horn: If the horn in your car isn’t equipped with an adjustable dial, or you’d like to make to make a bigger upgrade, you can swap the horn with a brand new model that is of more wattage or pitch. To accomplish this, you will have to remove the grounding cable from the car battery, then locate the horn, take it off away from its mounting bracket and then disconnect the power wire that runs to the rear on the horn. Then, connect both wires on the horn to connect it onto the bracket connect the battery and listen to your horn’s sound. It is possible to locate a new place for the horn if it’s larger than the previous one or connect more wires if your vehicle only has one horn.
Image credit: Amazon
3. Installing a relay kit: Installation of a Relay Kit A relay kit can be defined as a device that enables you to directly connect your car’s horns to its battery, giving them full power for increased volume and sound production. To install one in your car, disconnect its grounding cable, locate and swap out its relay in its fuse box with this kit, connect wires of this relay kit with batteries and horns before finally connecting back up with its host battery and listening out for sound.
Image credit: Amazon
Here are a few methods you can use to make the horn sound louder on your car. Find one that best meets your budget and needs; but keep an eye out for any regulations or rules surrounding car horns in your region or country, as some states may place restrictions on their use or frequency of usage. Be mindful of pedestrians and drivers alike by only using it when necessary!